RE-USING 3D MODELING DATA FOR
CONSTRUCTING 3D SIMULATION DATA
Jonggeun Kwak
Department of Industrial Information & Systems Engineering, Ajou University
San 5, Woncheon-dong, Yeongtong-gu, Korea
Min. S. Ko, Sang C. Park, Gi-Nam Wang
Department of Industrial Information & Systems Engineering, Ajou University
San 5, Woncheon-dong, Yeongtong-gu, Korea
Keywords: CAD, CAM, Modelling, Simulation, Manufacturing system design, PLC.
Abstract: With the aid of the powerful computational ability and software tools, we undergo rapid change in a whole
product manufacturing process. In a traditional way, it took long time and cost to build real manufacturing
line. The behind time change for the manufacturing process ends up with supplementing large amount of
budget. Therefore early detecting the errors on manufacturing process saves quite a big amount of time and
money. As a result, the need for plant simulations rises. When we simulate manufacturing line on a virtual
environment, it is not easy to acquire 3D data. If we have 3D CAD data, we can reuse them for each tools,
products and equipments for the manufacturing line. Even in this case, the size matters. The large size of
CAD data makes it difficult for us to directly use CAD data for simulation. As the CAD data and simulation
data differs in their own purpose, we can reduce the size of the CAD data without losing simulation purpose.
In this paper we propose effective methods for reducing the size of the CAD data and re-using them for
simulation, assuming the 3D CAD data are already available.
1 INTRODUCTION
As the computer hardware gets faster, we can deal
with large data which needs huge computation. In a
product design, the commercial CAD software is
widely used to model the products. Preparing 3D
simulation data from the scratch takes enormous
efforts and time which is not applicable for most
cases. The importance of the availability of CAD
information in product and process design and
process visualization is increasing rapidly. If we
already have CAD data for each component used in
the manufacturing process, we can reuse the CAD
data for simulation.
To build the simulation data, we need to
integrate the CAD information with manufacturing
models such as machining process simulation
models upstream with concurrent engineering
activities. In this case, there are two problems. One
is the data interfacing problem due to various CAD
data format (Iyer, Arjun, 2002). The other is the size
of the integrated CAD data. For the data format
problem, we used simple STL (Stereolithography)
format as a data interface. For the data size, we will
discuss in this paper.
Simulation data for the production line consists
of hundreds of CAD data for each device, robot and
part. Each CAD data can be some hundred
megabytes when represented in STL format. Even
for a small cell, the size of direct sum of CAD data
can reach several gigabytes. As a matter of fact, this
approach is not applicable for production line or
whole plant even we take consideration of the high
performance of the modern computer hardware.
The purpose of the CAD data is different from
that of the simulation data. The main purpose of
CAD data is to produce the model by verifying the
shape and checking the static interference between
assembled parts. It contains very detailed level of
geometry like small sized holes and small parts like
bolts and nuts, which results in a big size of the data.
On the other hand, simulation data needs not be
94
Kwak J., S. Ko M., C. Park S. and Wang G. (2008).
RE-USING 3D MODELING DATA FOR CONSTRUCTING 3D SIMULATION DATA.
In Proceedings of the Fifth International Conference on Informatics in Control, Automation and Robotics - RA, pages 94-98
DOI: 10.5220/0001492500940098
Copyright
c
SciTePress

described so detail. Though, it depends on the
simulation purpose, generally speaking, simulation
data needs far less level of detail compared to that of
the CAD data. In a large scale simulation like
manufacturing process simulation or whole plant
simulation, we assume that the operations which
need high accuracy already have been verified on a
cell level using OLP(off line programming). It
means, the error tolerance of the geometry for the
simulation data can be larger than that of CAD data.
Using the increased error tolerance, we can reduce
the size of CAD data. In this paper, we assume that
1) 3D CAD data is available for simulation.
2) In some cases, we assume that OLP program
data is available, like IGRIP or RobCAD for
the devices which has kinematic information
like robots or jig fixtures.
3) Triangular mesh is used for solid geometry
handling for various CAD data interface.
4) We do not assume any restriction for the
relationship between original CAD data and
converted triangular mesh geometry
hierarchy by IGRIP or RobCAD.
5) We assume developing our own simulation
software to adopt our simulation data.
2 REUSING 3D CAD DATA
We are developing manufacturing process
simulation software called PlcStudio. It is divided
into two major modules called generic kernel and
graphic module. The generic kernel is used to build
logical model of the manufacturing process. It uses
either software PLC(Programmable Logic Control)
or hardware PLC to control and verify the
manufacturing process, and interfaces graphic
module to display the simulation results and/or to
get the sensory information (Chang Mok Park, 2006).
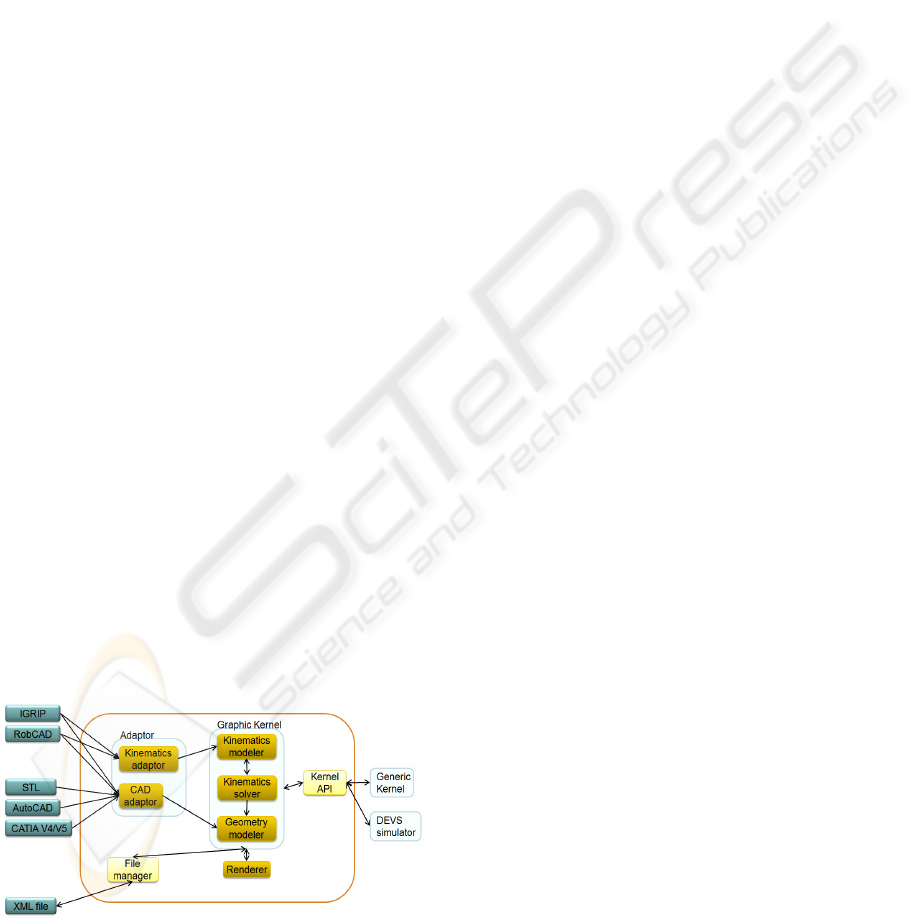
Figure 1: Graphic module architecture.
Graphic module gets the geometry information
from the CAD file generated by the CAD software
like AutoCAD or CATIA. Similarly, it can get both
the geometry information and kinematic information
from various OLP software like IGRIP or RobCAD.
2.1 Background and Related Work
There were many research for simplifying mesh for
the curved surface. Michael et el. summarized these
efforts into 3 classes (GarlandM, 1997). Vertex
decimation, vertex clustering and iterative edge
contraction. They suggested pair contraction method
using a quadric error calculation. The
implementation of the idea is available as an open
source, and it shows nice performance for the curved
surface. In many cases, the geometry of device for
the production line does not contain curved surface.
Therefore this approach is not effective for device
CAD model. For device CAD model, it is more
plausible to use geometric features only if we can
extract them.
2.2 Classification of CAD Data
If we have to build simulation data from the CAD
files, the size of total simulation data grows
exponentially. We can effectively reduce the size of
CAD data based on the features
Conceptually, CAD data can be divided into two
groups. The one is manufacturing devices like robots,
jigs, conveyors etc., which contains few curved
surfaces. The other is parts or workpieces, which
contains lots of curved surface. For the convenience,
we call the former as device CAD model and the
latter as workpiece CAD model.
2.2.1 Device CAD Model
Device CAD model data has the following
characteristics.
1) Has few curved surface :
In almost case, it can be represented with the
combination of box, cylindrical frustum,
sphere etc.
2) Has lots of primitives :
Contains lots of cylinders, boxes etc.
3) Has lots of small part :
It contains lots of small parts like bolts and
nuts, which are not necessary for simulation
purpose.
4) Has lots of holes :
The purpose of the device CAD model is to
manufacturing the device itself, so it
contains lots of holes for bolts and nuts for
part assembly.
RE-USING 3D MODELING DATA FOR CONSTRUCTING 3D SIMIULATION DATA
95

5) It contains inner part data :
In many cases, device CAD model data
contains invisible inner part data, which are
not necessary for simulation purpose.
2.2.2 Workpiece CAD Model
In many cases, workpieces have lots of curved
surface. For car assembly line, almost every
workpieces have smooth surface, like body, side,
door, hood, fender etc. The CAD model for this
workpieces are far more bigger than that of the
device CAD model, because it represents smooth
surface using triangular mesh. Typically, CAD
model for car door exceeds some hundreds mega-
bytes, while the size of device CAD model for
robots is some mega-bytes.
Due to the different characteristics, we apply
different methods to reduce the size of CAD model.
2.3 Reducing Device CAD Model Size
After converted by various software, the structural
information for the geometry data can be lost. This
makes it difficult to go further processing for
geometry handling. However, it is relatively easier
to detect geometric features from device CAD model
rather than workpiece CAD model.
We used the geometric features extracted from
device CAD model to reduce data size.
2.3.1 Replacing the Primitives
In many cases, the device CAD model contains lots
of primitives like cylinder, sphere etc. For replacing
cylinders, we assume that a n-side cylinder
representation in the CAD model is an
approximation of the pure logical cylinder which has
infinitely large n.
A cylinder consists of top, bottom and n-side faces,
where n ≥ 3. A cylinder with n-side consists of 4n-4
triangles. A cylinder contained in the device CAD
model typically has large n value. By detecting this
cylinder geometry and reducing the n, we can reduce
the size of data.
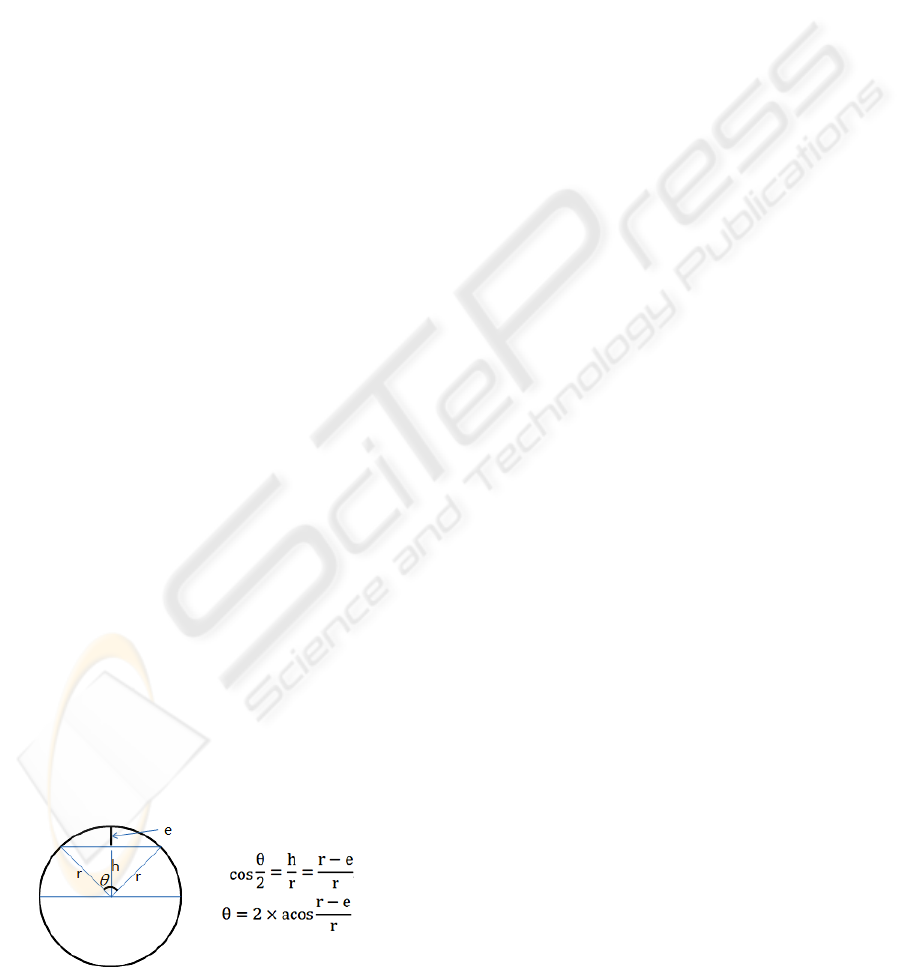
Figure 2: Calculation of n-side for cylinder.
Figure 2 shows how many number of cylinder
sides we can reduce, when the final error tolerance e
for simulation data is given. Using the radius r of the
pure logical cylinder and error tolerance e, we can
calculate maximum θ for reduced cylinder. The
reduced cylinder has 360/θ side faces.
Though this method is quite effective, it is
difficult to apply in real situation, because it is hard
to identify cylinder geometry from unstructured
triangular meshes. For sphere, it is more difficult to
identify. So this method is only applicable when the
CAD data contains structural information and we
can identify them.
Another problem for this method is after
replacing into the simple geometry, some parts
attached to the original cylinder side surface can be
dangling on a replaced cylinder.
2.3.2 Removing Small Parts
The device CAD model contains lots of small
components needed for part assembly. Small bolts
and nuts are one of those things. If these parts are so
small that the size is less than the error tolerance for
the simulation, we can safely remove them.
But in this case, it is not always possible to
identify small parts from unstructured triangular
meshes.
2.3.3 Removing Small Holes
The effect of removing holes from the geometry is
quite potential. A cube without hole can be
represented with 12 triangles, while a cube with one
hole of n side needs 4n + 8 triangles. (n+4 for top,
n+4 for bottom, 2n for side) If a hole is consists of
20 sides, the number of triangles reaches 4*20+8 =
88, which is more than 7 times of 12. If number of
holes increases, the number of triangles increases
rapidly.
The hole removing algorithm is difficult to
implement, because it is not always possible to
identify holes from unstructured meshes. For this
reason, first we detect small inner circle from a
surface. It is relatively easy to implement even if we
don’t have structural information.
Step 1: Group faces which exists in a same plane.
That means, the faces has the same plane equation,
and they are inter-connected.
Step 2: merge the grouped faces
Step 3: Trace boundary edges from the merged
face
Step 4: Identify outmost boundary edges
Step 5: Using the boundary edges, re-triangulate
the surface.
ICINCO 2008 - International Conference on Informatics in Control, Automation and Robotics
96

By applying these steps, we can easily remove
any circle in a plane, but it can only remove top or
bottom of the hole, whereas the wall of the cylinder
still remains. Theses cylinder walls are hard to
identify from unstructured set of meshes. These
walls can be further removed by visibility check
routine explained later.
2.3.4 Removing Invisible Parts
In many cases, CAD model contains invisible parts.
Components or parts of a component placed below
other component are invisible from user. For
example, the engine installed in a car is not visible to
the user unless the hood is open. In a simulation,
these invisible components need not be rendered.
After applying hole removal process, the cylinder
walls of the hole geometry are not removed, yet.
These wall are invisible to the user, so it can be
removed by applying visibility checking, too.
Deciding whether a given geometry is visible
from a given camera position or not requires quite
large computation and the implementation of the
algorithm is not simple. With the aid of modern
graphic card functionality, we can successfully
distinguished invisible parts from visible parts (Sang
C. Park, 2005). This method is easy to implement
and it is fast enough to apply, because it uses
hardware function.
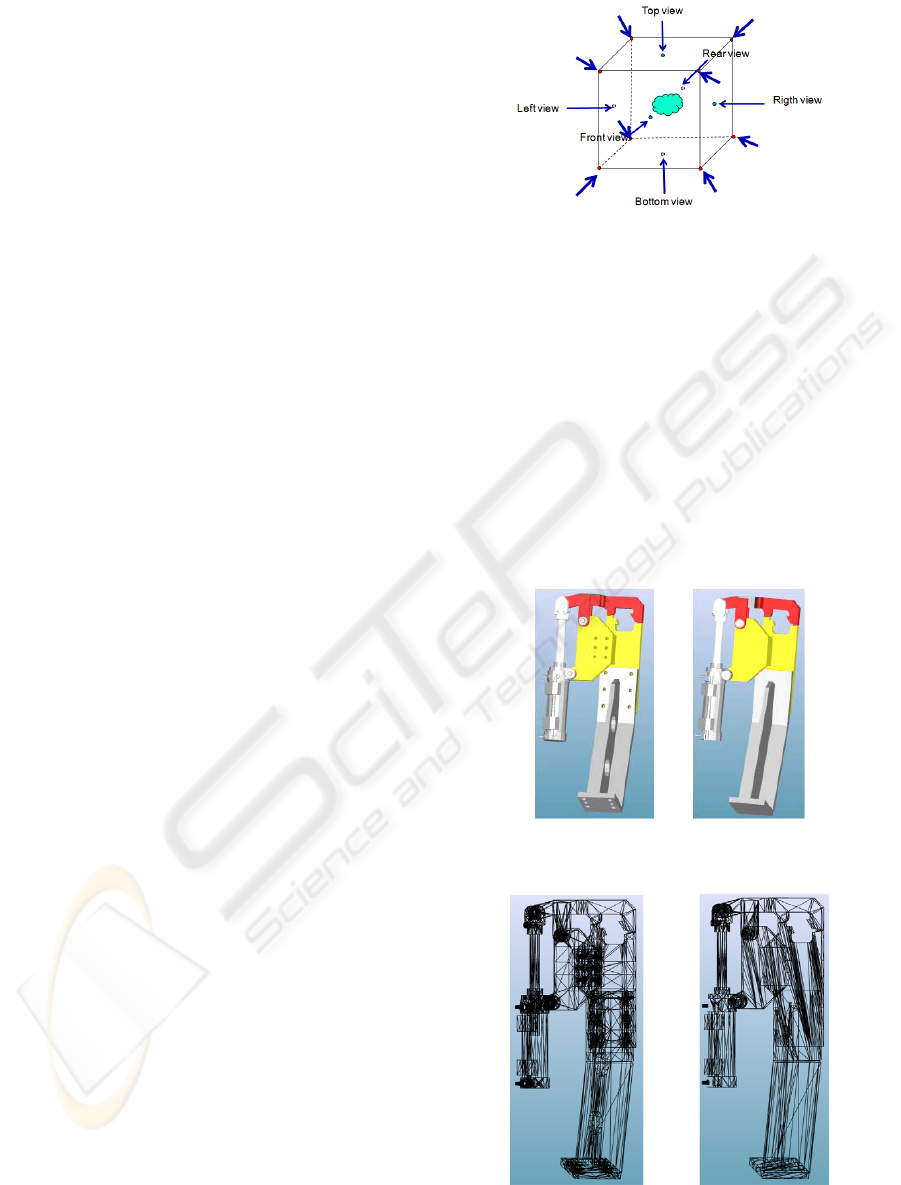
We take a shot for the scene while moving the
camera position. The typical camera positions
looking at the scene are 6 cubic directions plus 8
corner positions. Cubic directions are TOP,
BOTTOM, FRONT, REAR, LEFT and RIGHT
directions. Corner directions are top-front-left, top-
front-right, top-rear-left, top-rear-right, bottom-
front-left, bottom-front-right, bottom-rear-left and
bottom-rear-right directions as depicted in figure 3.
After taking shots at a given camera positions,
we collectively combine all shots, and
mark(remember) all visible parts. On the whole
scene, parts which is not marked as visible forms
invisible parts. The camera positions are
heuristically determined, and there are cases that
given camera positions can’t distinguish invisible
parts. But in many cases, 6 cubic angle point and 8
additional corner point is enough to distinguish
visibility property.
These process can be implemented by drawing
each entities with unique color onto the back-buffer,
while moving the camera positions, and read each
pixel value back from back-buffer, and checking the
color value as a unique key.
Figure 3: Camera positions to view the scene.
By using graphic hardware for deciding visibility,
we need not implement the visibility algorithm and
it can be computed very fast. The visibility checking
algorithm implemented in a graphic card is widely
tested by vendor for a long period of time, so it is
well verified algorithm. We can use the algorithm
almost for free. In addition, modern graphic card can
draw millions of triangles in a second. It means that
we can compute the visibility for a large scene in a
very short time.
Next figure shows the result of data reduction by
removing invisible parts after removing small parts
and holes.
# triangles = 8220 # triangles = 1845
Figure 4: Processing result: before and after.
Figure 5: Mesh view: before and after.
RE-USING 3D MODELING DATA FOR CONSTRUCTING 3D SIMIULATION DATA
97

2.4 Reducing Workpiece CAD Model
Size
Workpiece CAD model which contains very
complicated surface is not proper to apply the
proposed algorithm. The proposed algorithm is
based on the features extracted from 3D CAD model.
It is almost impossible to identify features from the
workpiece CAD model containing curved surfaces.
So we can use well known mesh simplification
methods like decimation to the curved surface.
3 RESULT AND DISCUSSION
The proposed methods are based on the feature
extraction of the CAD model. Extracting primitives
from the CAD is not always successful. If the CAD
keeps the information about the primitive, we can
easily extract them and we can apply the methods.
But in general case, we can’t assert that information
is available. Identifying small parts has the same
problem. But, identifying the holes and removing
invisible parts works very well even the CAD data
does not keep any information about the feature. It
can even be extracted from raw triangular mesh.
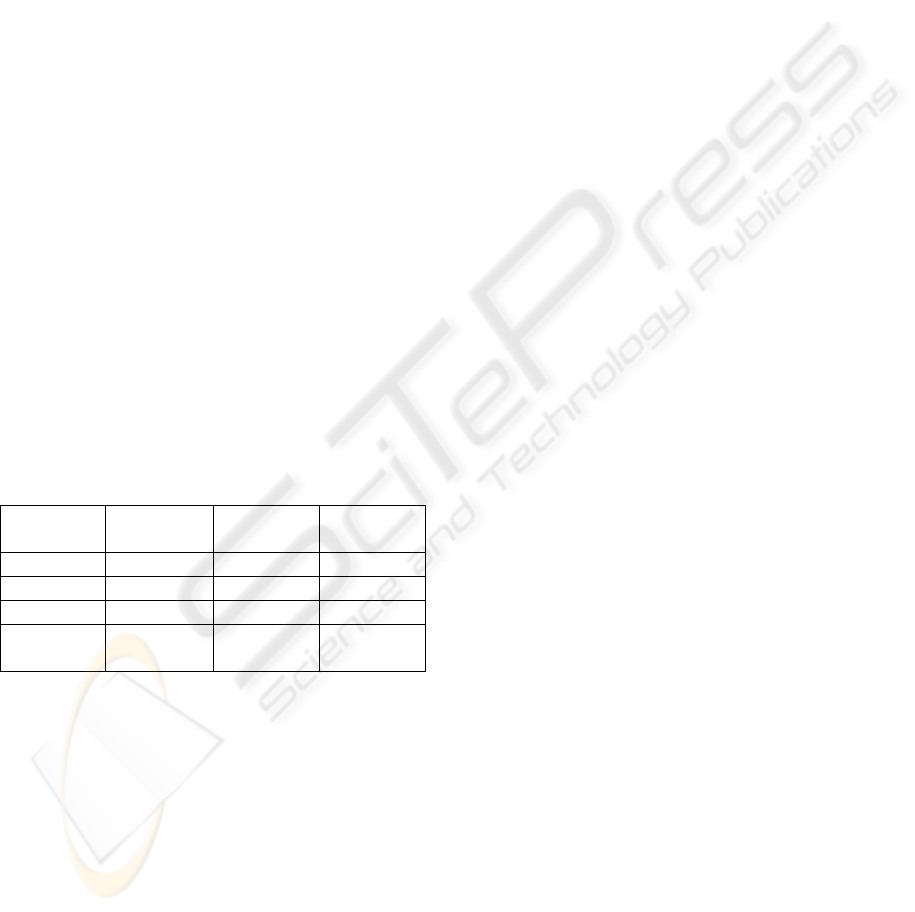
The next table shows the result of reducing cell data
which contains 16 devices. We only applied non
curved surface reduction algorithm for this result.
Table 1: CAD data reduction result.
Original
data
Reduced
data
Ratio(%)
# devices 16 16 100
# solid 4,567 2,966 64.94
# mesh 86,833 24,170 27.84
#
triangles
3,316,146 600,478 18.11
4 CONCLUSIONS
When we have to construct 3D simulation data from
CAD data, we have difficulties for the size of the
CAD data. In the proposed method, we used an hole
removal and visibility checking algorithm to reduce
the data size. This method is easy to implement and
very fast because it utilizes graphic hardware
functionality. If the original CAD data contains
more information for solid identification, we can
further apply the methods by replacing the
geometries. These methods applied to non-curved
surface do not distort the original shape except that it
removes the holes and small parts, which are smaller
than the simulation tolerance error. Using these
methods, we can reduce the size of the sample
production line by 20% of the original data. In our
future work, we plan to develop improved method to
identify features from unstructured triangular mesh.
REFERENCES
Sang C. Park: Pencil curve detection from visibility data.
Computer-Aided Design 37(14): 1492-1498 (2005)
Chang Mok Park : Development of Virtual Simulator for
Visual Validation of PLC program. In CIMCA 2006
Iyer, Arjun, 2002. CAD data visualization for machining
simulation using the STEP standard. In Journal of
Manufacturing Systems. 2001/2002.
GarlandM, Heckbert P. Surface simplification using.
quadric error metrics. In proceedings of SIGGRAPH
1997,. August 1997. p. 209–16.
ICINCO 2008 - International Conference on Informatics in Control, Automation and Robotics
98
