3D TOF CAMERA BASED OBJECT METROLOGY
Mohammed Ibrahim M. and Peddaiah Thappeta
Honeywell Technology Solutions, Bangalore, India
Keywords: 3D TOF Camera, Object Geometry, Metrology, Hough Transform, Vanishing Point.
Abstract: Range cameras that determine both range and intensity at each pixel has matured in the last decade and is on
the verge of revolutionizing the metrology market in retail, automotive, aerospace and many other. In this
paper, we present an algorithm for measuring 3D geometry (height, width and depth) of rigid object using
Time of Flight (TOF) camera. The method exploits geometrical structure of object such that intensity and
range image compliments each other for a reliable measurement. We discuss the performance of algorithm
under varying operating conditions.
1 INTRODUCTION
In the past few years, many industries have adopted
automation in order to increase the productivity.
Extracting 3D information about the object at
different stage in the production cycle is a key and
yet challenging task for automation. For example,
logistics companies adopt automation at several
stages in the entire supply chain to stay in this highly
competitive business. However, certain aspects of
billing procedure still require human intervention.
For example, measurement of consignment
geometry (size, length, volume etc.) requires human
effort. Any non-contact, automated measurement of
3D information about the object helps in achieving
higher productivity, unambiguous billing and
customer satisfaction.
In the past few decades, researchers have
been implementing different methods to measure 3D
object geometry. Considerable effort has been
directed towards developing optimal systems which
can construct a three dimensional image (x, y, z).
Specifically, optical methods are a widely
researched and well developed field. Optical
distance measurement methods include
Interferometry, Stereo/Triangulation and Time-of-
Flight. A more detailed explanation and review of
these methods can be found in (Dorrington, 2006).
In the recent past, researchers have shifted the focus
on Time of Flight (TOF) camera based application
for 3D object scanning and analysis. For example,
the TOF cameras have been demonstrated for
applications such as 3D object scanning (Cui, 2010)
and localization (Distante, 2010). The authors
(Bostelman, 2006) uses TOF camera to detect
obstacles and travel path detection applications to
guide visually impaired through stereo audio
feedback.
In this paper, we present an algorithm for
accurate 3D geometry measurement of rigid objects.
With suitable experimental results, we show how we
reliably measure object dimension irrespective of
distance (to object), illumination condition and
background complexity.
The following section presents basic
information on 3D TOF camera and its utility for
metrology application. The experimental set up and
problem formulation for developed methodology is
discussed in section 3. In section 4, we present step
by step details of proposed algorithm. Experimental
results and sensitivity analysis of developed
methodology for several operating parameters are
presented in section 5. The paper is summarized
with some concluding remarks in section 6.
2 BACKGROUND
2.1 Time of Flight (TOF) Cameras
Time-of-flight (TOF) cameras are specialized active
camera sensors that determine both range and
intensity at each pixel by measuring the time taken
by light to travel to the object and back to the
camera. The capability of 3D TOF sensor to offer
depth measurements at video frame without
449
Ibrahim M. M. and Thappeta P..
3D TOF CAMERA BASED OBJECT METROLOGY.
DOI: 10.5220/0003857404490452
In Proceedings of the International Conference on Computer Vision Theory and Applications (VISAPP-2012), pages 449-452
ISBN: 978-989-8565-03-7
Copyright
c
2012 SCITEPRESS (Science and Technology Publications, Lda.)

scanning opens up new applications beyond gaming.
In our work, we have used TOF camera developed
by PMD Technologies Inc. (Chiabrando, 2009).
2.1.1 D TOF Camera for Object Metrology
In the last few years, non-contact object imaging and
geometry estimation using 3D TOF camera has been
demonstrated in applications such as automated
inspection for quality control. Most of these involves
two broad steps namely object segmentation and
geometry estimation. The availability of depth data
for each image pixel in 3D camera enables relatively
easy object segmentation and geometry estimation
compared to 2D imaging.
The algorithm proposed in (Sobers, 2011)
deals with object geometry reconstruction using 3D
TOF camera. Using camera calibration information,
the method filters range data in order to segment the
object from background. Authors then perform data
fitting using least square method for fitting curves of
different polynomials. The algorithm provides the
geometry of the object i.e. height, length, radius,
circumference, slope angle, groove, etc. for the
given object. The algorithm however has limitation
in not extracting the 3
rd
dimension of the object (i.e.
depth). However, most of the metrology applications
such as logistics industry necessitate extraction of
object depth as well. In this paper, we demonstrate
3D geometry measurement for rigid rectangular
object using 3D TOF camera.
3 MEASUREMENT EXAMPLES
3.1 Experimental Setup
We demonstrate the potential of our system for
object dimension measurement with a simple
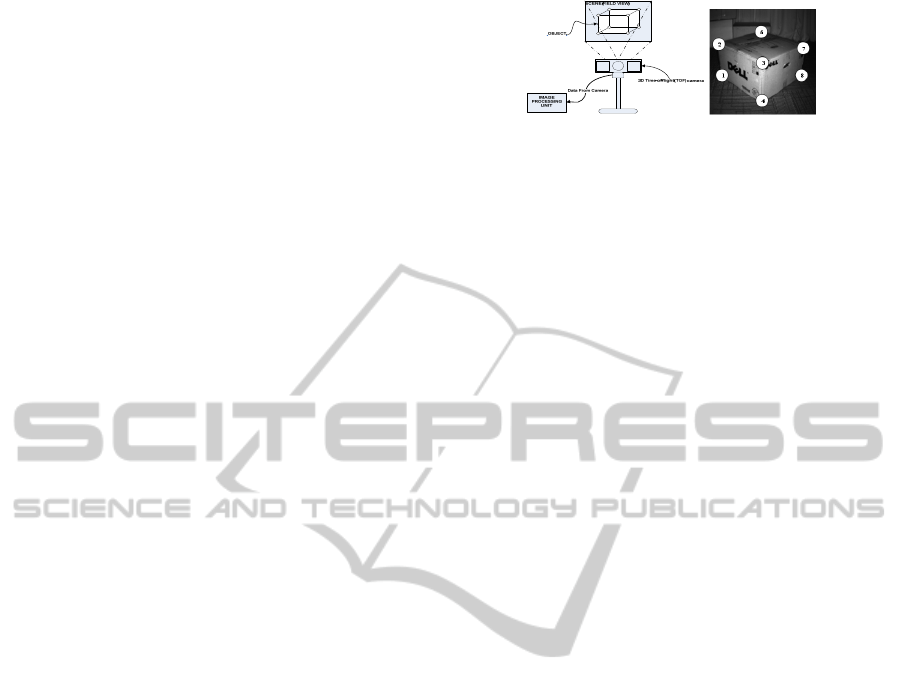
laboratory set up. As shown in Figure 1 (a), 3D TOF
camera is placed in front of the target object such
that at least three sides of the object are seen. The
data from the camera consists of amplitudes of the
reflected signal from the objects, intensity values
and range values for each pixel. The higher the
amplitude value of a pixel, the more reliable is its
corresponding distance value. The camera returns
depth value for each pixel directly in Cartesian
coordinate with known information on Field of View
(FOV) and lens properties. The intensity image is
similar to a simple gray scale image from a
traditional 2D camera.
To demonstrate the approach that we have followed
for automated dimension measurement application,
Figure 1: Experimental set up (a) data acquisition system
(b) test object.
we have considered rigid packaging object shown in
Figure 1 (b). It has six flat sides with edges
orthogonal to each other.
3.2 Problem Formulation
The key to dimension (height, width and depth)
measurement is reliable extraction of object edges
and their corners. Ideally, if edges formed by corner
pairs (1, 2), (3, 4), (7, 8) are reliably detected, the
problem of dimension measurement is reduced to
indexing corresponding range values. However,
several reasons (varying lighting condition, complex
object texture, poor reflection) makes edge
extraction incomplete. In our algorithm, we are
exploiting parallel property of certain edges in order
to detect missing edges. Under perspective image
geometry, such parallelism leads to condition
wherein edges share common vanishing point.
Consider two linear lines with slopes m
1
, m
2
and
their y-axis intersecting value of c
1
and c
2
respectively. The intersecting point (X
i
, Y
i
) is the
common solution and is called Vanishing point of
two lines.
As evident from Figure 1 (b), the measurement
of length, width and depth can then be accomplished
by computing Euclidean distance between range
values belonging to designated corners.
4 ALGORITHM
4.1 Integration Time Setting
Selecting appropriate integration time (exposure
time) is crucial for accurate range measurement in
TOF camera. We have adopted an iterative method
that determines appropriate integration value based
on number of valid pixels, a flag that indicates if
range measurement for a pixel is valid or not based
on reflected signal strength. Invalid pixel count
reduces as integration time increases until certain
value after which it starts increasing. The integration
time corresponds to global minima in number of
invalid pixels is chosen as desired value. Table 1
illustrates the relationship
2
1
3
4
6
7
8
5
VISAPP 2012 - International Conference on Computer Vision Theory and Applications
450

Table 1: Integration time vs. invalid pixel variation.
Integration time
(msec) No. of invalid pixels
No. of
saturated
pixels
100 7257 0
300 2644 14
…
…
…
1400 354 65
1500 325 94
1600 426 167
4.2 Object Segmentation
The target object is separated from scene by
applying threshold to range image. It is equivalent of
placing a virtual vertical plane in the scene. The
content behind the plane are ignored. The threshold
is either set manually (based on guideline that object
be not placed beyond certain distance from camera)
or determined automatically. Automated threshold
estimation method include frame differencing
between current scene and reference scene (taken
one time with no object in the scene)
4.3 Corner Detection
The foreground object in amplitude image is then
subjected to Canny edge detection followed by
corner detection algorithm known in the literature.
The corners C are archived with their (x, y) location
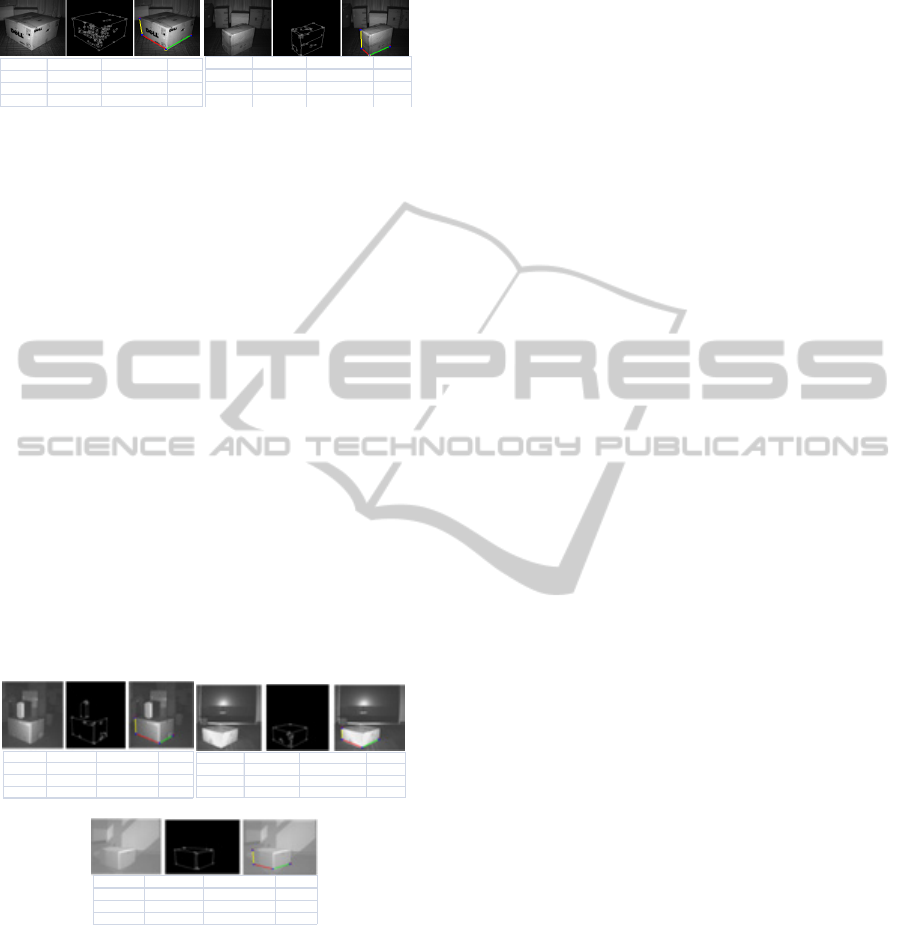
information. Referring Figure 2 (a), the key now
lies with locating corners that guarantees reliable
dimension measurement. The depth information of
the corner 6 is more un-reliable due to flying-pixel
phenomenon (Cui, 2010) and hence any
measurement with corner 6 as reference point will
not be accurate. For reason that region around corner
3 is complex, we exclude it from consideration for
further processing. Thus, the subsequent steps
described below focuses on determining corners
1,2,4,7 and 8.
To determine above said corner points, we
first fit lines for all edges using Hough transform.
Given the fact that lines formed by corners (1,2),
(3,4) and (7,8) are orthogonal to x-axis, we limit
theta value in Hough transform to values closer to
zero degrees.
(a) (b) (c)
Figure 2: (a) detected edges and corners (b) line fitting for
extreme edges (c) projection of all vertical edges.
Experiments indicates line fitting along corners (1,
2) and (7, 8) are relatively simpler and accurate.
Hence we process these outer edges separately first.
Figure 2 (b) illustrates fitted lines L
1
and L
2
. From
these lines, the corners (1, 2, 7, 8) are located by
searching in corner set C, for those which are closest
to lines’ neighbourhood (Euclidean distance).
As evident from Figure 2 (a), edges are cluttered
along corner pair (3, 4) and hence line fitting turns
out to be erroneous. Thus, in our algorithm, we
exploit geometrical characteristics that line formed
along corner pair (3, 4) is parallel with those of (1,
2) and (7, 8). In projective transform this property
translates to common vanishing point for all three
lines. Hence, we first determine vanishing point V
1
for lines L
1
and L
2
. Subsequently, all other vertical
lines in the image are projected (Figure 2 (c)) and
intersected with horizontal line passing through V
1.
The vertical line that intersects or closely intersects
with vanishing point V
1
is finally picked up. The
corner 4 is then searched in corner set C such that
the Euclidean distance between line co-ordinate and
corner co-ordinate is minimal.
4.4 Corner Validation
Generally, reflections from object edges have
mixed-pixel effect, a condition that results in
unreliable range measurement. Hence, any
computations based on such pixels are erroneous. To
handle such scenario, we perform localized search
around identified corners such that nearest pixel that
falls on inner surface of the object are selected.
4.5 Dimension Measurement
As discussed earlier, the dimension measurement
now reduced to problem of computing Euclidean
distance between range values corresponding to
detected corners. While Euclidean distance between
corner pairs (1, 2) or (7, 8) yield object height,
corner pair (4, 8) offers width measurement and
corner pair (1, 4) used for object depth
measurement.
5 RESULTS AND DISCUSSIONS
In addition to testing under normal condition, we
conducted several other experiments to assess the
performance under difficult conditions of
background and lighting. Figure 3 presents sample
results along with measurement error under normal
3D TOF CAMERA BASED OBJECT METROLOGY
451

condition. Rest of this section discusses sensitivity
of method to different operating parameters.
Figure 3: Experimental results – normal conditions.
5.1 Integration Time
Objects at different distances require different
integration (exposure) time to compute range. For
instance, experiments indicate the measurement
error for object at far distance is almost stable when
integration time set between 300 and 1000
microsecond. Our adaptive method of setting
integration time described in section 4.1 ensures
accurate results irrespective of object distance.
5.2 Background Complexity
As shown in Figure 4 (a), despite the presence of
other objects, algorithm successfully segments the
target and measures its dimension. In addition, we
conducted experiments testing performance against
high reflecting background which tends to saturate
pixels faster and thus necessitating appropriate
integration time selection. With adaptive integration
time setting procedure, such scenario has been
successfully handled as shown in Figure 4 (b).
(a) (b)
(c)
Figure 4: Results with complex conditions (a) multiple
objects (b) reflecting background (c) bright background.
Figure 4 (c) shows the performance of algorithm
when target object is placed under bright light. As
evident, the proposed method is insensitive to bright
background lighting condition. It is due to the fact
that algorithm uses amplitude image to extract object
edges and corners. Any processing based on
intensity image (which is sensitive to background
lighting) under such condition would have resulted
in inaccurate edges and corners.
6 CONCLUSIONS
A new algorithm for measuring 3D object geometry
was presented in this paper. We presented the
proposed approach with quantitative and qualitative
analysis with appropriate illustrations under normal
and challenging conditions. Ability of the proposed
approach to dynamically set integration time makes
it robust under difficult operating conditions. In
addition to using geometrical characteristics of
target effectively, the developed method exploits
different information sources (intensity image,
amplitude image and range image) in ensuring
accurate dimension measurement.
REFERENCES
Dorrington, A. A., Carnegie, D. A. and Cree, M. J., 2006.
“Toward 1-mm depth precision with a solid state full-
field range imaging system,” .Proc. SPIE, Vol. 6068 –
Sensors, Cameras, and Systems for
Scientific/Industrial Applications VIII, part of the
IS&T/SPIE Symposium on Electronic Imaging, San
Jose, CA, USA, pp. 60680K1–60680K10.
Cui Y., S. Schuon, D. Chan, S. Thrun, and C. Theobalt,
2010 “3d shape scanning with a time-of-flight
camera,” in IEEE CVPR 10, pp. 1173–1180.
Distante C., G. Diraco, and A. Leone, 2010, “Active range
imaging dataset for indoor surveillance,” Annals of the
BMVA, London, vol. 3, pp. 1–16.
Bostelman R., P. Russo, J. Albus, T. Hong, and R.
Madhavan, 2006, “Applications of a 3d range camera
towards healthcare mobility aids,” IEEEInternational
Conference on Networking, Sensing and Control
(ICNSC’06), pp. 416–421.
Chiabrando F., R. Chiabrando, D. Piatti, and F. Rinaudo,
2009, “Sensors for 3d imaging: Metric evaluation and
calibration of a ccd/cmos time-of-flight camera,”
Sensors, vol. 9.
Sobers L X Francis, Sreenatha G Anavatti, Matthew
Garratt, 2011, “Reconstructing the geometry of an
object using 3D TOF Camera”, Merging Fields Of
Computational Intelligence And Sensor Technology
(CompSens), 2011 IEEE Workshop On
PARAMETER ACTUAL(inm) MEASURED(inm) ERROR
HEIG HT 0.34 0.32305 0.01695
WIDTH 0.55 0.579384 ‐0.29384
DEPTH 0.55 0.548208 0.001792
PARAMETER ACTUAL(inm) MEASURED(inm) ERROR
HEIGHT 0.41 0.361635 0.048365
WIDTH 0.4 0.391544 0.008456
DEPTH 0.205 0.18906
4
0.01593
6
PARAMETER ACTUAL(inm) MEASURED(inm) ERROR
HEIGHT 0.295 0.278583 0.016417
WIDTH 0.365 0.358162 0.006838
DEPTH 0.545 0.544632 0. 000368
PARAMETER ACTUAL(inm) MEASURED(inm) ERROR
HEIGHT 0.205 0.18461 0.02039
WIDTH 0.405 0.399843 0.005157
DEPTH 0.4 0.423643 ‐0.023643
PARAMETER ACTUAL(inm) MEASURED(inm) ERROR
HEIGHT 0.305 0.316303 ‐0.011303
WIDTH 0.39 0.425641 ‐0.035641
DEPTH 0.395 0.413984 ‐0.018984
VISAPP 2012 - International Conference on Computer Vision Theory and Applications
452
