
A Graph-based Software Tool for the CAD Modeling
of Mechanical Assemblies
Stanislao Patalano
1
, Ferdinando Vitolo
1
and Antonio Lanzotti
2
1
DiME, University of Naples Federico II, P.le Tecchio 80, Naples, Italy
2
DIAS, University of Naples Federico II, P.le Tecchio 80, Naples, Italy
Keywords: Mechanical Design, Graph Theory, Digital Pattern, CAD Modeling, Graphical User Interfaces.
Abstract: The challenge of reducing designing time for new mechanical assemblies, especially in the context of large
companies, encourages the use of methods and tools aimed to support designing activities and to re-use the
company know-how. Furthermore, the design choices must be rapidly check to avoid errors that could cause
delay or expensive re-designing. In such a context, the graph theory and related algorithms could be used to
define a transfer function, easily to implement, that governs a software tool able to support the designing
activities. Therefore, the paper presents a designing approach, based on the graph theory, aimed to generate
the geometric modeling of mechanical assemblies. The approach and the software tool are useful both for
designer and companies that want to customize and improve such activities. Finally, the paper shows the
case study related to the design of a transversal manual gearbox and the generation of a GUI, developed in
MatLAB® environment, to validate the approach.
1 INTRODUCTION
In engineering practice, designers often define
mathematical models that describe the behavior of
part or system (mechanical, electrical, naval) under
development. Then, designers provide the
manipulation of a series of equations by using both
the knowledge related to each system and the
relations between mathematical models and physical
reality (Shai and Preiss, 1999). In such context, it is
difficult to individuate each parameter and related
dependencies with the other ones. This is often due
to the large number of equations and parameters that
govern the mechanical or electrical system.
A strategic activity is the reuse of past
experiences during the design phase. The reuse is
often related to the specific designer who has
acquired experiences.
Especially large companies adopt structured
work teams to manage and distribute engineering
knowledge (Sharmin et al., 2009). In such a context,
we believe that software tools aimed to support the
design tasks must adopt Knowledge Based
Engineering (KBE) to capture and reuse knowledge,
in automatic way, during design activities, acquiring
it from each expert designer. In fact, Sandeberg
(2003) define KBE as “the use of advanced software
techniques to capture and re-use product and
process knowledge in an integrated way”. Several
researchers worked on the re-use of product and
process knowledge. Chen et al. (2012) developed a
multi-level assembly model that is useful to capture
the information in different levels of the design
phases. Tang et all (2010) use a design structure
matrix (DSM) method for capture and reuse the past
experience knowledge. In particular, they use
additional tables, linked to DSM, to record
information as type and level of interaction,
milestones and criterions on parameters. This
method requires, however, designer defines
interactions in a subjective way. Therefore, designer
must already have past experiences.
A different approach used especially in the
context of small companies is that the designer must
work and manage all information (as dependencies,
or best cases) in opportune way. This means for the
designer to pour on his skill the success of the
design. Therefore, a concrete contribute to the
growth of small companies is to provide
methodological approach and software tools to adopt
KBE in the above-mentioned way.
During the designing of mechanical parts as
wheels, levers or shafts, after the preliminary sizing
60
Patalano S., Vitolo F. and Lanzotti A..
A Graph-based Software Tool for the CAD Modeling of Mechanical Assemblies .
DOI: 10.5220/0004299000600069
In Proceedings of the International Conference on Computer Graphics Theory and Applications and International Conference on Information
Visualization Theory and Applications (GRAPP-2013), pages 60-69
ISBN: 978-989-8565-46-4
Copyright
c
2013 SCITEPRESS (Science and Technology Publications, Lda.)

of the part, designers need to verify the correctness
of the hypotheses in use, especially in relation with
multi-objective tasks. In particular, the use of Multi-
Objective Optimization methods induces further
decisions for designers. In fact, designers have to
choose the a priori articulation of preferences i.e.
the specification of parameters, and coefficients
when they are sure about decisions; otherwise, they
have to adopt methods with a posteriori articulation
of preferences when it is difficult to express a
preference before the acquisition of results (Marler
and Arora, 2004). Then, designers build a digital
model by using CAD-CAE environment to deepen
form, function and geometrical characteristics of the
product or to simulate product performances, as
strength or product compliance (Franciosa et al.,
2011).
Therefore, there is a huge need for supporting all
these phases by simplifying and optimizing the
product development process. To meet this need of
integrated knowledge, within CAD-CAE
environment, it is possible to choose additional
knowledge-based modules that make easier the
design tasks for classic and common product (Sham,
2010), (VV. AA., 2008), (VV. AA., 2012). The main
problem of such modules is that they are difficult to
adapt to specific requirements if you are not an
experienced programmer.
If designer do not adapt existing knowledge-
based modules, they have to find different way to
take into account and to represent dependencies
among design parameters.
A very useful tool to rapidly represent the
dependencies among parameters or variables is
provided by the graph theory. Graphs, in fact,
provide the representation of binary relations and
can be used for schematic modeling of many
problems in mathematics, engineering, computer
science, economics, sociology, linguistics, and
wherever it is necessary to represent a binary
correspondence (Deo, 2004), (Franciosa et al.,
2010), (Franciosa et al., 2012).
The way to associate a design methodology to
graph theory could be expressed as follows. In the
axiomatic design, Suh (1990) and (1997) claimed
that is necessary to start from a poor-level of details
for each domain (requirement domain or physical
domain) and to progress using zigzagging technique
between the domains. Using the hierarchical
decomposition, it’s impossible to represent the
dependencies or interactions between the parameters
or elements of product (Tang et al., 2009). With the
use of graph theory it’s possible to create the
directed graph (digraph) that clearly represents the
dependencies between the parameters for any level
of the product hierarchy structure (Deo, 2004).
Therefore, once defined the level of detail it is
possible to associate a digraph for the “transversal”
dependencies in the level. Some authors reserve the
term arc for an oriented or directed edge, while edge
is for undirected edge. In the following we deal with
digraphs, and therefore the term edge will be used to
indicate the oriented edge. For deepening on graph
theory, see (Deo, 2004); (Bondy and Murty, 2008)
and (Wilson, 1978).
The use of graphs has several advantages in
product design:
to represent all dependencies in a simple and clear
way;
to increase the level of detail by expanding the
nodes of the graph.
Therefore, the graph representation fits a
common need in designing activities. In fact,
designers first define high-level requirements and
then increase the level of detail by introducing
further parameters and related dependencies among
them.
Some works in literature are aimed to integrate
tools based on graph within CAD systems. In
Franciosa et al. (2009) a tool for a quick checking of
tolerance specifications, directly assigned to a CAD
model, were proposed. Lockett and Guenov (2005)
presented a new approach based on the average area
for a module integrated in CAD feature recognition
and aimed to molded parts. Also during the
generation of CAD models within high-level CAD
environments, as CATIA® or UGS-NX - the last
one added with Wave Engineering module (Sham,
2012), it is possible to explore links between the
assembled parts through graphs.
The present paper proposes an approach and a
software tool to accomplish the geometric modeling
of mechanical assembly by supporting the
preliminary phase of dimensioning as well as the
updating during the re-use of consolidated CAD
models. In particular, the approach allows the
management of company know-how according a
KBE point of view and provides an easy-to use
graphical interface based on directed graphs.
The paper is arranged as follows. Section 2
summarizes the approach to CAD modeling of
assemblies based on graphs. Section 3 and Section 4
provides the application of the approach to the case
of an automotive gearbox and the implemented GUI,
respectively. Finally Section 5 draws conclusions.
AGraph-basedSoftwareToolfortheCADModelingofMechanicalAssemblies
61
2 THE APPROACH TO CAD
MODELING OF ASSEMBLIES
BASED ON GRAPHS
2.1 General View and Fields of
Intervention
Especially in the context of small or medium
companies, designers are often the main actor in
decision processes, during designing or CAD
modeling activities. The authors here provide an
approach and a software tool first to make automatic
the calculus chains due for the dimensioning and the
locating of assembling parts and then to improve the
re-use of company knowledge related to the
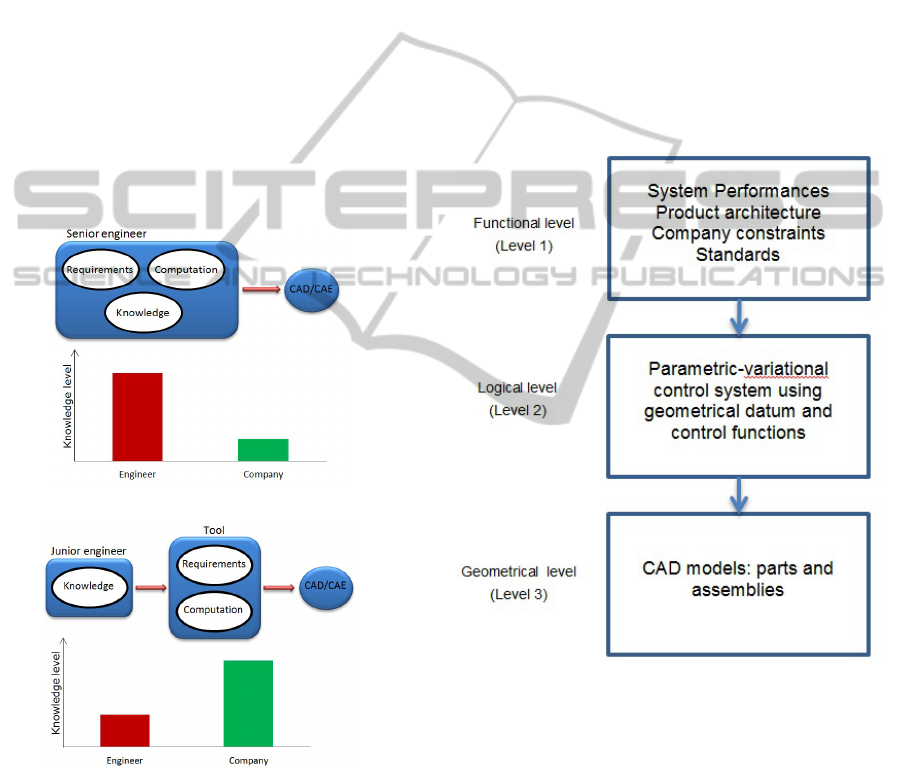
designing activities of different designers (Figure1).
Therefore, also repetitive activities or manual
optimization loops are significantly improved.
a)
b)
Figure 1: a) typical design scheme performed in small-
medium company; b) proposed design scheme.
The proposed approach to CAD modelling deals
with three different levels within the geometric
modelling of assemblies. The three levels are
(Figure 2):
Functional level (Level 1) where functional groups
are defined; at this level it is possible to operate with
a series of parameters to accomplish the consistency
of functional groups (as for example costs, number
of instances, types of unified components);
Logical level (Level 2) where datum, parameters
and control rules for dimensions are defined; at this
level it is possible to manage datum or equations to
accomplish geometrical consistency of assembling
parts (curves and surfaces for mating conditions,
axes of rotation, distances between planes as
functional gaps);
Geometrical level (Level 3) where the geometries
of parts, that compose the assembly, are modeled; at
this level it is possible to operate local changes to
dimensions as well as to further parameters of parts
(thickness and length of parts, curvature’s radii,
Young’s modulus).
Figure 2: Three levels of intervention for the proposed
approach.
The present approach and the developed software
tool allow operating at each of the three levels. In
particular, it is possible to proceed from level 1 to
level 3 for the generation of a new CAD model or,
alternatively, to operate only in one of the three
levels.
The preliminary sizing of an assembly often
imposes to work with a high number of variables
and related equations. Therefore, during this phase it
could be strategic to have a tool that simplify the
management of such equations and makes easily
detectable the dependency of a variable from others.
GRAPP2013-InternationalConferenceonComputerGraphicsTheoryandApplications
62
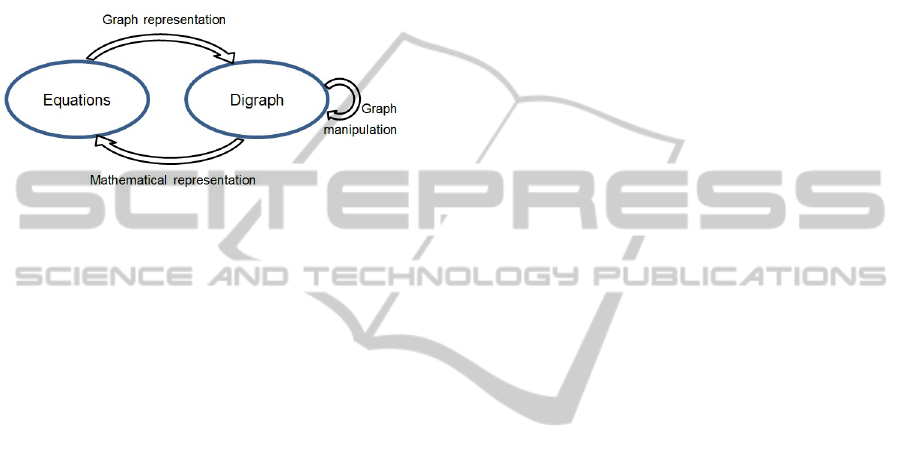
In particular, Shai (2003) claims that is possible to
transform the mathematical problem towards the
graph field and then return with the solution to
mathematical field. The approach presented in this
paper first represents the mathematical and
geometrical relationships by means of graphs; then,
it provides the manipulation of the edges in order to
change the dependencies and, finally, to return to the
mathematical field. This general flow is shown in
Figure 3.
Figure 3: General flow of the proposed approach.
2.2 Approach
The approach to geometric modelling deals with an
editable transfer function based on graphs as
depicted in Figure 4. In particular, the general
transfer function Y is able to correspond (x
1
, x
2
,….,
x
n
) input parameters to a set of assembly variables
(y
1
, y
2
,…., y
n
) by using parameters, relations and
related computation tasks. At this stage, the set of
relations, representing the dependencies between
parameters, is associated to digraphs. In particular,
the nodes are associated to parameters, while
directed edges represent existing relations. On the
other side, a matrix representation could be used for
software implementation.
Furthermore, the relations represented through
digraphs can be handled generating new transfer
functions. The handling consists of three phases:
extraction of graphs;
editing of graphs;
updating of relations.
2.2.1 Extraction of Graph
The initial set of nodes and relations, assigned by
designers, are represented through digraphs. In
particular, the nodes are arranged in the space by
using the Fruchterman-Reingold’s algorithm as in
(Franciosa, 2009). This algorithm generates the
layout of the graphs according the degree of
attraction or repulsion of nodes. In particular, the
degree of repulsion is a function of the number of
links between the node under consideration and the
surrounding ones linked to the first.
Fully connected graph is the assumption. If the
graph is disconnected and it has several components
the algorithms can be applied to each component.
Before extracting the graph designer is asked to
isolate the input parameters. In fact, these
parameters will be the starting nodes from which to
generate the digraph until to arrive to ending nodes
that represent the outputs i.e. assembly variables.
2.2.2 Editing of Graphs
The phase deals with the editing of digraphs and the
running of algorithms to check validity of the
digraphs. The designer can reverse or delete a link
between two nodes. The possibility to reverse the
direction of the edge, and then of a dependency,
allows to change relationships without
reprogramming the data structure.
When an edge is reversed the algorithm for loop
detection, working on edge list, checks digraphs to
highlight loops to be avoided. In particular, a series
of integers 1,2,….,n is assigned to the vertices.
Starting from the first vertex, the algorithm builds a
directed path P=(
,...,
) until there are no further
vertices linked. Then the algorithm checks if there is
a directed edge from the
vertex to
. If there is a
directed edge a circuit is found; if there is no
directed edge, the algorithm deletes
and checks
for
. Then it repeats the previous steps until
P=(
), increases
to next vertex and repeats the
check for the last time. During the execution of steps
a flag vector [1xm] (where m is the number of edges)
could used to record the edges just covered (Deo,
2004).
Similarly, when the edge is removed the
algorithm for isolated node detection (Figure 5),
working on adjacency matrix, verifies if the vertices
adjacent to the removed edge have become isolated.
In particular an edge is defined through two ordered
vertices. Therefore the algorithm detects the adjacent
vertices after the edge removal.
The algorithm proposed in Figure 5 is provided
to analyse throughout the adjacency matrix. In
particular, the vertex under consideration is
indicated with letter “i”, while “j” indicates the node
of interaction. If the cell of adjacency matrix,
identified by them, shows a zero value, it means that
there is no a linked edge between them. If the entire
row “i” has all cells with zero value, i.e.
∑
0, then the vertex is isolated.
AGraph-basedSoftwareToolfortheCADModelingofMechanicalAssemblies
63

Figure 4: scheme for transfer function and graph
representation.
2.2.3 Updating of Relations
During this phase the relationships between the
parameters are updated. In this way, the editing of
graphs moves to transfer function by means of the
updated relations. The presented approach based on
the above-mentioned three phases (extraction,
editing and updating) implies a series of advantages
for designers. During the generation of initial CAD
models designer is supported when he focuses on
large set of equations and builds related digraph. In
fact, he could easily check, by using the loop
detection algorithm, if there are redundant equations
and he could provide to delete them. Also the
extracting phase supports designer when he locates
the parameters, i.e. the initial nodes of digraphs, as
first member of only one equation to avoid
redundancies.
Then, different designers, who have to operate
changes and consequent regenerations of CAD
models, could operate in an easy and intuitive way
on the digraphs without changing the equations set
out by other colleagues. In other words, it is not
necessary to rewrite one or more equations to
operate changes to transfer function, but it is
sufficient to change the digraph with simple and
intuitive actions.
3 CASE STUDY: GEARBOX
“CMT-6M”
The approach to CAD modelling was applied to the
design and modelling activities due to develop an
automotive manual transverse gearbox with two
shafts and six maximum gears, in the following
called “CMT-6M”. To accomplish the complete
geometrical modelling of the gearbox, the three
levels (functional, logical and geometrical levels)
were carried out.
Figure 5: Algorithm for isolated node detection.
3.1 Functional Level
To accomplish the designing of a family of
gearboxes a set of functional parameters was taken
into account (Table 1), according to know-how of a
European automotive group.
Table 1: Functional parameters.
Materials for
g
ears
Mat
G
Materials for shafts
Mat
S
Costs
Cs
N
umber of shafts
Ns
N
umber of
g
ears
N
G
Teeth Modulus
m
The bounding volume of the assembly is a
significant requirement in gearbox design as it deals
with the characteristics of layout engine
compartment. Often, similar gearboxes have to be
assembled within different engine compartments and
this induces several changes to the whole
architecture of gearbox as for the dimensions of
gears, the transmission ratios, the distances between
shafts. As same 3D bounding volumes could be
accomplished through different combination of
GRAPP2013-InternationalConferenceonComputerGraphicsTheoryandApplications
64
functional or datum parameters, it was not settled as
functional parameters but it was used as inspection
parameter during re-design activities.
3.2 Logical Level
For the sizing of modular toothing the classic theory
for spur gears (Charchut and Thomas 1972) and
(Juvinall and Marshek, 1994) was used. As the
present analysis was not focused to fatigue design,
Lewis' theory together appropriate correction
factors, contained in UNI 8862 standards, for both
nominal and allowable stresses, was used.
Table 2 summarizes the general equations for
gearbox sizing. Table 3 and Table 4 show the
additional equations for straight and helical toothed
sizing, respectively (Appendix A shows notation
used in Table 2, Table 3 and Table 4).
Table 2: General equations for external gears.
Minimum number
of teeth
2
1
1τ
2τ
sin
ϑ
2τ
sin
ϑ
Gear ratio
⁄
Tooth width
∗
Pitch diameter
∗
Outside diameter
2
Max size
Table 3: Additional equations to characterize straight-
toothed gears.
Bending
∗
∗
∗
∗
Wear
∗
∗
Table 4: Additional equations to characterize helical-
toothed gears.
Bending
∗
∗
∗
∗
∗
Wear
∗
∗
Number of teeth
dummy
cos
Gear width
∗cos
Furthermore, a set of geometrical datum for the
proper layout of the gearbox elements was
introduced. In particular, to accomplish the
assembling of the manual transverse gearbox with
two shafts and six gears, called “CMT-6M”,
according to a top-down approach, the datum set
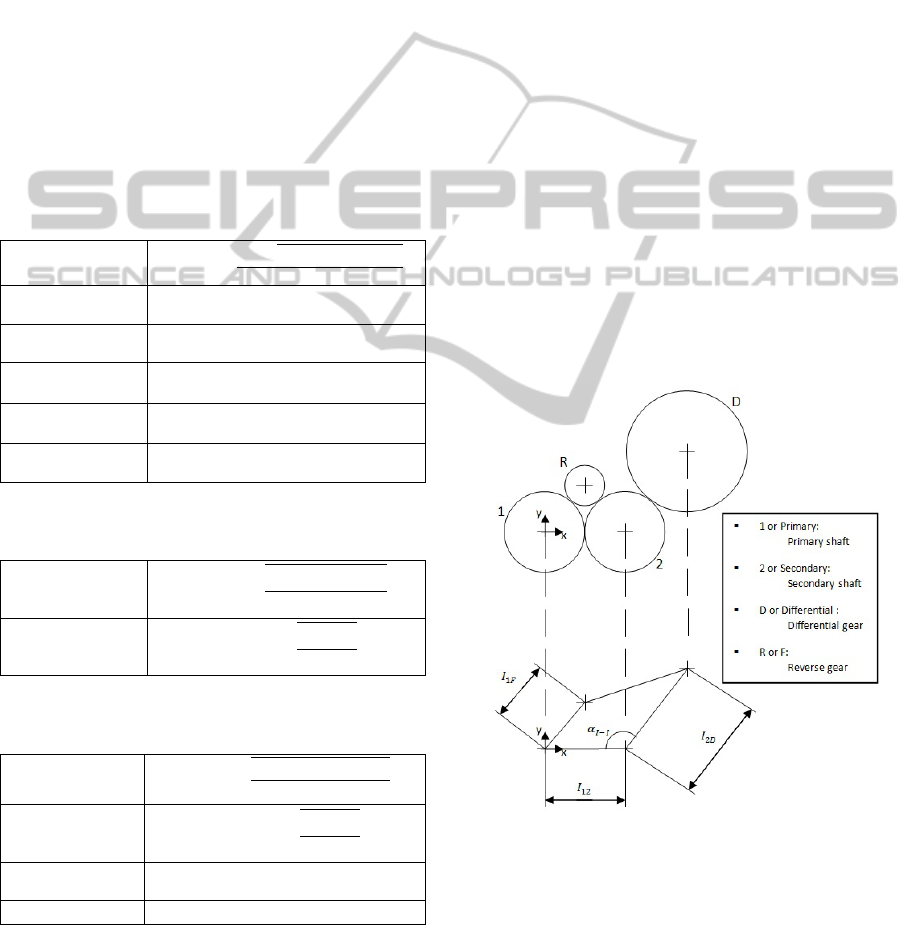
depicted in Figure 6 was used. Four axes referred,
respectively, to the primary shaft, the secondary
shaft, the differential gear and the reverse gear
compose the datum set.
The datum set is located by means of four
parameters (Figure 6):
Axis base primary shaft-idler shaft (
) = distance
between the axis of the primary shaft and the axis of
the reverse idler gear.
PS-SD angle (
) = angle between the lines that
link the traces of primary-secondary axes and
secondary-differential axes, contained in the plane
perpendicular to such axes;
Axis base primary-secondary (
) = distance
between the drive axis and the driven shaft;
Axle base secondary-differential (
) = distance
between the axis of the drive shaft and the axis of
the differential.
3.2.1 Digraph Representation
The parameters and relations defined in functional
and logical levels for each spur gear are translated
into the digraph depicted in Figure 7.
Figure 6: Datum set of the CMT-6M gearbox.
The designer defines all dependencies among
parameters and sets the input in terms of vector of
parameters and list of edges.
The digraph of gearbox (Figure 8) is composed
by a number of subgraphs equal to the number of
spur gear belonging to gearbox. When the gearbox is
AGraph-basedSoftwareToolfortheCADModelingofMechanicalAssemblies
65
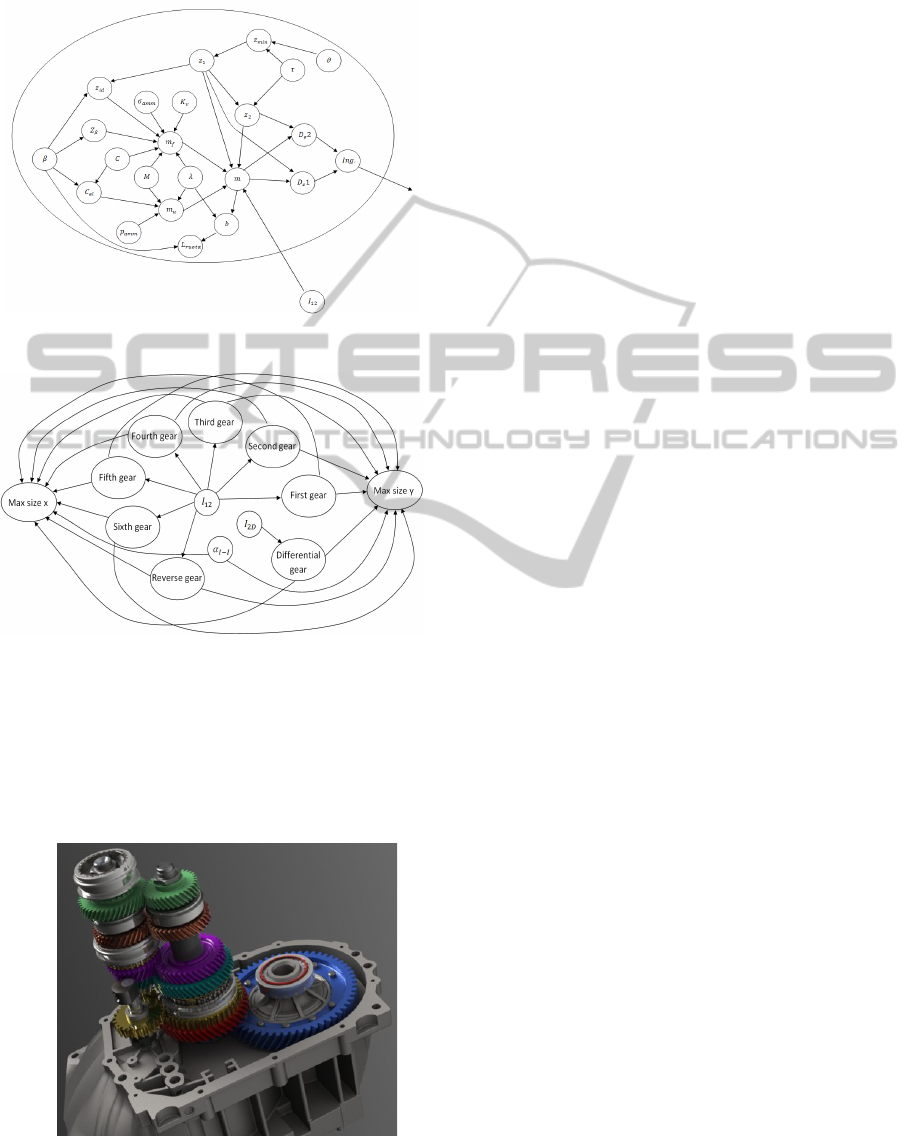
characterized by a different number of gear ratios, it
is possible to add or delete the sub-graph depicted in
Figure 7.
Figure 7: Sub-graph for helical toothed spur gear.
Figure 8: Digraph for CMT-6M gearbox.
3.3 Geometrical Level
Figure 9 depicts the 3D model of CMT-6M gearbox
corresponding to geometrical level. At this level the
independent parameters i.e. the ones that are not
included in the digraph could be updated.
Figure 9: 3D CAD model of CMT-6M gearbox at
geometrical level.
4 CMT-6M GUI
IMPLEMENTATION
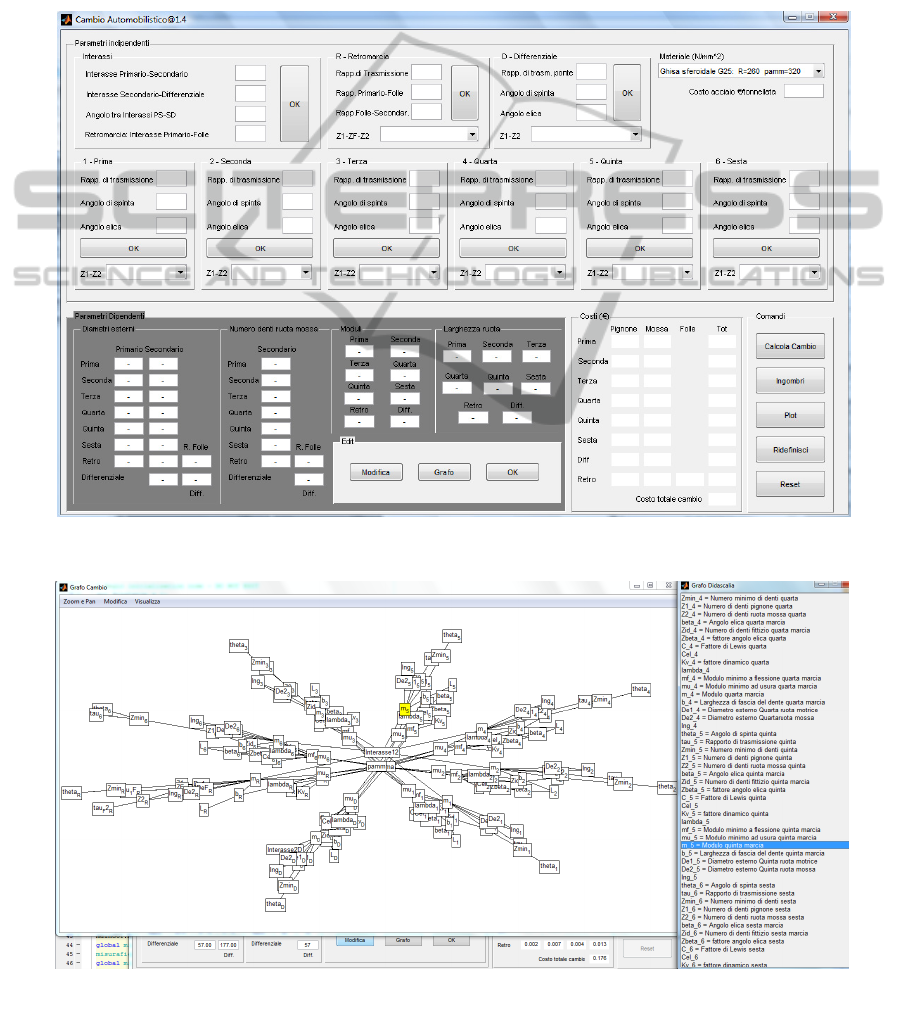
A Graphical User Interface (GUI), developed in
MatLAB environment, was accomplished in order to
support the design of automotive manual transverse
gearboxes (Figure 10). The main window is divided
in two fields: the upper field where the inputs values
of parameters are typed (the field of independent
parameters); the lower field where the output values
are evaluated (the field of dependent parameters).
Furthermore, in the lower field are also located the
keys to provide the editing of generated digraphs
and the evaluation of relations.
The designer can set the number of gears,
belonging to the gearbox, up to a maximum of six.
Figure 11 depicts the digraph of CMT-6M (with
six gears). Using such interface, the designer could
interact within the digraph, by exploring the whole
set of parameters, by modifying the existing links
between nodes and by using the algorithms for loop
detection and for isolated node detection,
respectively. To reduce the computational time,
when designer selects an edge to remove it, (Figure
12) the algorithm for isolated node detection works
only on the two adjacent nodes.
The possibility of
reversing the edge was implemented to convert an
influenced node in a node that influences.
The inversion of a link has to be carefully used
by expert designers. In particular, it should not be
used for a large set of parameters as it causes the
inversion of corresponding relations with
unacceptable consequences.
Otherwise, the deleting of an edge from digraph
determines the elimination of dependence in the
corresponding equation. So, the father-child relation
that link two adjacent nodes is deleted. Designer can
interactively deletes a link between two nodes when
the corresponding relation is negligible.
When all links associated to a node are deleted,
the corresponding parameter becomes
“independent”. Therefore, the deleting of links is
useful for nodes located at the end of digraph chains
i.e. for nodes that have no outgoing edges. In fact, in
such case the deleted edge does not cause
unpredictable effects to the design process but it
allows setting a value to a parameter that is
independent from the calculated one. An example is
the gear width parameter (
in the sub-graph
for helical toothed spur gear (Figure 7). As the node
has not outgoing edges, the designer could
disconnect this node (see Figure 12) and provide a
new input value, keeping the geometrical correctness
of the toothing.
GRAPP2013-InternationalConferenceonComputerGraphicsTheoryandApplications
66
The computational results are currently displayed
in a dedicated environment. By clicking on “Plot”
command, the characteristic surfaces of toothing i.e.
head, sides and foot of helical-toothed gears are
displayed on screen (Figure 13). In this environment
is also possible to change the mesh degree (Figure
14) to accomplish the desired accuracy of
geometries. Then, it is possible to export the points
of meshes, related to the geometry of whole
assembly, by using a text format
to generate the 3D model in any CAD environment.
The designer could also evaluate the bounding
volumes of CAD models. In a separate window
(Figure 15), in fact, it is possible to evaluate the
distances between two points along different
directions and, then, to easily assign different input
values to functional or datum parameters to fit, after
the automatic re-generation of geometries the
desired bounding volume.
Figure 10: GUI for CMT-6M gearbox.
Figure 11: Automatic generation of gearbox digraph (left). Legend of digraph (right).
AGraph-basedSoftwareToolfortheCADModelingofMechanicalAssemblies
67
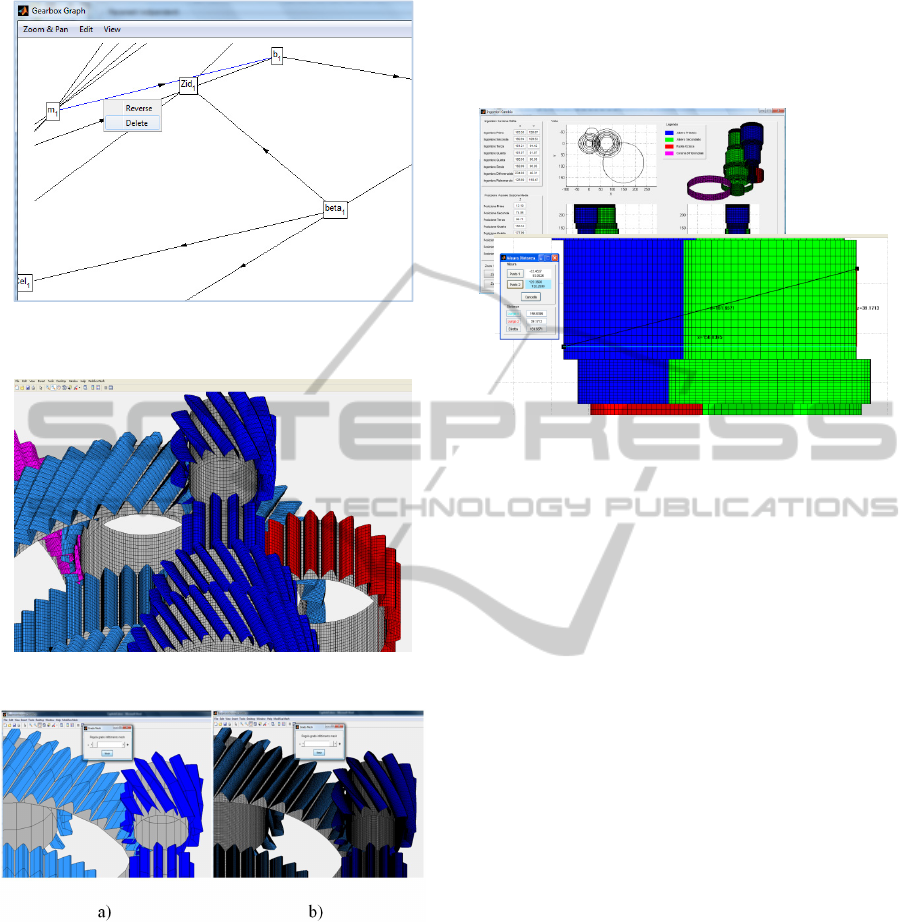
Figure 12: The second command of the node context
menu, allows removing edge.
Figure 13: Environment for display of the surfaces.
Figure 14: a) minimum degree mesh: 2 elements for edge;
b) maximum degree mesh: 50 elements for edge.
5 CONCLUSIONS
The paper presents an approach, based on the graph
theory, aimed to generate the geometric modeling of
mechanical assemblies.
The approach focuses on the management and
re-using of company know-how, according to a KBE
point of view.
The developed GUI enables designers to
interactively and easily generate several instances of
geometrical models by acting on a digraph
representation instead of operating on a large set of
equations and parameters.
Figure 15: Environment for bounding volume evaluation.
The introduction of such a GUI implies both
significant times for its setting up and costs due to
the training of designers. Nevertheless, the use of
GUI contributes to the reduction of time to market of
new gearboxes, enriches the company know-how,
improves the sharing of knowledge between
designers and facilitates the division of tasks
between designers with different designing
experiences. A possible scenario in using such GUI
is that “expert designers” could use digraph
representation to share knowledge, to add relations
among parameters and, more generally, to change in
an interactive way, complex transfer functions that
control dependent design parameters. Otherwise,
“younger designers” could accomplish the
requirements related to the overall volume of
gearbox by modelling different configurations of
gears.
The GUI is actually not embedded in a specific
CAD environment to give the possibility to export
results towards any CAD environment. In fact, the
GUI exports data as a cloud of points assuring an
effective integration within the company CAD
systems in use.
Further developments, concerning with the GUI
definition, will deal with the integration of the GUI
in a CAD environment to optimise the generation of
CAD models; moreover, the setting up of
dependencies among graph nodes will be
accomplished in a fully automatic way starting from
the existing equations. Finally, different case studies
dealing with partially known transfer functions will
be taken into account.
GRAPP2013-InternationalConferenceonComputerGraphicsTheoryandApplications
68

ACKNOWLEDGEMENTS
The present paper was developed with the economic
support of MIUR (Italian Ministry of University and
Research) performing the activities of the project
PON01_01268 “Digital pattern product
development: a pattern driven approach for
industrial product design”.
REFERENCES
Bondy, J. A., Murty U. S. R., 2008. Graph theory,
Springer. New Delphi.
Charchut, W., Thomas, A. K., 1972. Ingranaggi, Tecniche
Nuove. Milano.
Chen, X., Gao, S., Yang, Y., Zhang, S., 2012. Multi-level
assembly model for top-down design of mechanical
products. Computer Added Design, vol. 44, pp. 1033-
1048.
Deo, N., 2004. Graph theory with applications to
engineering and computer science, PHI Learning.
New Delphi.
Franciosa, P., 2009. Modeling and simulation of
variational rigid and compliant assembly for tolerance
analysis, PhD Thesis. Naples.
Franciosa, P., Patalano, S., Riviere, A., 2010. 3D tolerance
specification: an approach for the analysis of the
global consistency based on graphs. International
Journal of Interactive Design and Manufacturing, vol.
4 (1), pp. 1-10.
Franciosa P., Gerbino S., Patalano, S., 2011. Simulation of
Variational Compliant Assemblies with Shape Errors
Based on Morphing Mesh Approach, Int. Journal of
Advanced Manufacturing Technology, vol. 53,
Numbers 1-4, pp.47-61, ISSN 0268-3768.
Franciosa P., Gerbino S., Lanzotti A, Patalano S., 2012.
Automatic evaluation of variational parameters for
tolerance analysis of rigid parts based on graphs,
International Journal of Interactive Design and
Manufacturing, ISSN 1955-2513, Springer Paris, DOI
10.1007/s12008-012-0178-4.
Juvinall, R. C., Marshek, K. M., 1994. Fondamenti della
progettazione dei componenti delle macchine, ETS.
Lockett, H. L., Guenov, M. D., 2005. Graph-based feature
recognition for injection moulding based on a mid-
surface approach. Computer-Aided Design, vol. 37,
pp. 251-262.
Marler, R. T., Arora, J. S., 2004. Survey of multi-objective
optimization methods for engineering. Structural and
multidisciplinary optimization vol. 26 (6), pp. 369-
395.
Sandeberg, M, 2003. Knowledge based engineering – in
product development. ISSN: 1402-1536.
Shai, O., 2003. Transforming engineering problems
through graph representations. Advanced Engineering
Informatics, vol. 17, pp. 73-93.
Shai, O., Preiss, K., 1999. Graph theory representations of
engineering systems and their embedded knowledge.
Artificial Intelligence in Engineering, vol. 13, pp.
273–285.
Sham Tickoo, 2010. CATIA V5R19 for engineers and
designers, Dreamtech Press.
Sham Tickoo, 2012. NX8 for designers, CADCIM
Technologies.
Sharmin, M., Bailey, B. P., Coats, C., Hamilton, K., 2009.
Understanding knowledge management practices for
early design activity and its implications for reuse.
CHI 2009 Proceedings of the 27
th
international
conference on human factors in computing systems,
pp.2367-2376.
Suh, N. P., 1990. The principles of design. Oxford
University Press. New York.
Suh, N. P., 1997. Design of Systems. Annals of the CIRP,
vol. 46 (1), pp. 75-80.
Tang, D., Zhang, G., Dai, S., 2009. Design as integration
of axiomatic design and design structure matrix.
Robotics and Computer-Integrated Manufacturing,
vol. 25, pp. 610-619.
Tang, D., Zhu, R., Tang, J., Xu, R., He, R., 2010. Product
design knowledge management based on design
structure matrix. Advanced Engineering Informatics,
vol. 24, pp. 159-166.
VV.AA., 2008. CATIA - Product Knowledge Template
Definition 2, Dassault Systemes. www.3ds.com/
product/catia.
VV.AA., 2012. Data sheet CREO Advanced Assembly
Extension, PTC Inc.
Wilson, R. J., 1978. Introduzione alla teoria dei grafi,
Cremonese Editore.
APPENDIX A - NOTATION
Below are listed the parameters shown in Table 2,
Table 3 and Table 4:
= transverse pressure angle;
= number of teeth on driven gear;
= number of teeth on drive gear;
= helix angle;
= module;
= face factor;
= Lewis’s geometric factor;
= 0.830.88∗ for 15°30°;
= torque;
= allowable stress;
= allowable pressure;
= dynamic factor;
= helix angle factor.
AGraph-basedSoftwareToolfortheCADModelingofMechanicalAssemblies
69
