ThermoFlowScan: Automatic Thermal Flow Analysis of Machines
from Infrared Video
Arindam Saha, Jitender Maurya, Sushovan Mukherjee and Ranjan Dasgupta
Embedded Systems and Robotics, TCS Research & Innovation, Kolkata, India
{ari.saha, jitender.maurya, sushovan.mukherjee, ranjan.dasgupta}@tcs.com
Keywords:
Infrared Image, Segmentation, Feature Extraction, Thermal Flow Measurement, Machine Condition Monitor-
ing.
Abstract:
Periodic maintenance is a primitive task for preventive maintenance of machines. Abnormal heat generation
or heat flow is one of initial indicators of probable future failure. In this paper we presented an autonomous
inspection system for heat flow monitoring and measurement of machines in non-invasive way. The proposed
system uses infrared (IR) imaging to capture thermal properties of machines that generate heat. Heat sources
are segmented and all segmented regions are tracked until heat is present to record the changes in heat pattern.
Every hot segment is broken into multiple buckets that aligned towards a specific direction. Heat propagation
towards every direction is analysed. The outcome of the presented analysis calculates rate of thermal flow
along every directions. Presented results show that the proposed method is capable of measuring heat flow
accurately for different type of machines and the analysis has usability in the domain of predictive maintenance
for machines.
1 INTRODUCTION
Primary goal of a machine manufacturer is to pro-
duce machines that deliver output consistently within
a specified error tolerance. Low tolerant machines are
required to have high level of repeatability and ac-
curacy. There are many sources of error responsible
for affecting these machine performance parameters
and abnormal heat generation or heat flow is initial
indicators of such errors. Periodic maintenance is one
of primitive task for preventive maintenance. The in-
spection is a sensitive work in many other industries
like oil refineries, manufacturing, mechanical and it
is carried out in offline mode and industries faces a
downtime loss for offline inspection. Machine con-
dition monitoring is done for the use of predictive
maintenance, which is not only determining present
systems, but it is a technology of predicting future
possible abnormalities. The need of continuous un-
obtrusive machine inspection is gaining popularities
during recent years for cost savings. The main goal
of automatic machine maintenance in an unobtrusive
way is to health checking of industrial machines to re-
duce down time cost to industries. Maintenance work
usually is done on the basis of some parameter which
gives information about machine conditions like tem-
perature, vibrations, pressure, flow etc. In this paper
Maximum heat area
within this segment
Coldest area within
this image
Detected heat
segments
Heat flow
arrows
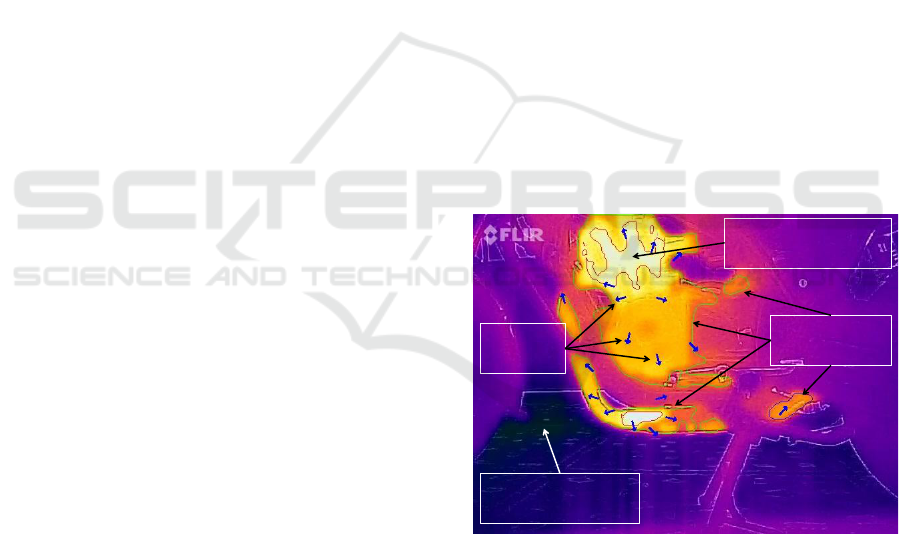
Figure 1: Thermal Image: Multi-level segmentation of
heated regions with heat flow directions.
we are focusing on continuous assessment of thermal
profile of machines.
Abnormal heat generation and thermal flows in
any machine are early signs of any fault. Abnor-
mal temperature rise in a machine can cause dam-
age to several components in the system resulting
in down time and high repair costs. It is crucial to
avoid abnormal heat generation and flow for increase
machines longevity. With the above motivation, we
present an end to end computationally inexpensive
Saha A., Maurya J., Mukherjee S. and Dasgupta R.
ThermoFlowScan: Automatic Thermal Flow Analysis of Machines from Infrared Video.
DOI: 10.5220/0006267206370644
In Proceedings of the 12th International Joint Conference on Computer Vision, Imaging and Computer Graphics Theory and Applications (VISIGRAPP 2017), pages 637-644
ISBN: 978-989-758-225-7
Copyright
c
2017 by SCITEPRESS – Science and Technology Publications, Lda. All rights reserved
637

system to monitor thermal condition of machines us-
ing IR imaging and machine vision. Proposed sys-
tem is capable of detecting sudden heat changes and
autonomous heat flow by analysing thermal contour
behaviour or heat distribution profile. Major contri-
butions for the presented work are:
• All heat sources are detected, segmented, tracked
through out the inspection duration.
• Rate of heat flow on all directions for every heat
source are calculated.
• Presented system is computationally inexpensive
and performs in real-time.
2 LITERATURE REVIEW
Several studies are available on finding thermal
changes on infrared images. The studies are focused
several areas like diagnosing disease on human bod-
ies, monitoring building power consumption, moni-
toring factory manufactured product etc. Heat sig-
nature changes with disease either on the skin or in-
side muscular tissue. So researchers showed inter-
est on finding early symptoms of many diseases by
analysing the heat signature of human body (Kacz-
marek and Ruminski, 2009; Bagavathiappan et al.,
2009). Recently Rajoub & Zwiggelaar (Rajoub and
Zwiggelaar, 2014) proposed facial thermal analysis
for deception detection. These methods are limited
to check small heat changes from a single image and
are not suitable to measure heat flow on machines.
Building interior monitoring is another major us-
age of thermal imaging. Researchers proposed several
methods for 3D thermal mapping for build monitor-
ing (Vidas et al., 2013; Omar et al., 2014). Usages of
optical and infrared cameras are gaining interest for
creation of 3D thermal model (Rangel et al., 2014;
Saha et al., 2016). Thermal profile shows any heated
object very distinctly in the scene and this feature help
detection of any animal in dark. Researchers (Wein-
mann et al., 2014; Pal et al., 2016; Deshpande et al.,
2015) showed methods for object detection through
thermal imaging on robotic platform. All methods de-
tect heated object without any proposition for thermal
flow measurement.
Starman & Matz (Starman and Matz, 2011) pre-
sented a system for detecting cracks using infrared
thermography. This proposed system is very costly
and very specific to object. So the usages are lim-
ited for easy general usage for industrial predictive
analysis. Clough et al. (Clough et al., 2012) pro-
posed methods for condition monitoring thermal error
for spindles through thermal imaging. The system is
limited to only continuous temperature monitoring of
different parts of spindle. Al-Habaibeh & Robert (Al-
Habaibeh and Robert, 2003) proposed a method for
an autonomous monitoring system for several manu-
facturing like drilling, grinding, welding etc. using
novelty detection. Both the methods are lacking in
analysis of heat flow which is the most important fea-
ture for predictive machine inspection. Eftekhari et
al. (Eftekhari et al., 2013) proposed a fault detec-
tion algorithm for circuit fault in the stator windings
of an induction motor. The process generates his-
togram of temperature profile. It also explores the
correlation between hottest region on the motor body
and the fault severity. Subsequently, a comparison is
made with healthy motor features. Proposed method
is very much limited with the type of the machine
and required generalization for usage in a wide range
of machines. Ashish & Vijay (ASHISH and VIJAY,
2014) presented a survey for fault detection of ma-
chines based on temperature where standard devia-
tion, mean, skewness, energy, entropy are calculated
on the entire image to understand fault. So these sys-
tems are limited to find out any sudden abnormal heat
immediately.
3 SYSTEM OVERVIEW
Conditional monitoring is the process of identifying
a significant change which is indicative of a develop-
ing future fault in machines. Our goal is to present
a heat flow analysis model which will help us under-
stand further, such indicative behaviour of machines
in an unobtrusive way. Heat profile of any machines
changes with time and it flows from heat source to
colder regions, results in continuous heated regions.
We assume a machine would generate unwanted heat
patterns and flows in case of any fault. Therefore we
keep our interest only on finding heated regions and
corresponding heat flows.
3.1 FLIR based Infrared Imaging
Thermal imaging device or infrared cameras, can
only detect radiated heat energy. FLIR produces dif-
ferent variety of infrared imaging devices which is
customized for specific type usage. FLIR recently
launched a very cost effective product called FLIR
ONE (http://www.flir.com.hk/flirone), a smart-phone
attachment for easy usage by everyone. Our proposed
system uses a FLIR ONE as infrared imaging device.
FLIR ONE thermal sensor comes with 160x120 ther-
mal resolution and optical sensor with 640x480 res-
olution. Both images are blended using FLIR MSX
VISAPP 2017 - International Conference on Computer Vision Theory and Applications
638
technology and final resolution is 640x480. FLIR
ONE is capable to detect temperatures between -20
degree Celsius to 120 degree Celsius with a resolu-
tion of 0.1 degree Celsius and captures thermal videos
with a speed of 6 fps approximately. Frames are
stored in 4:2:0 YUV format and encoded with h264
encoder.
3.2 Colour Palettes
Thermal cameras operate on infrared range which is
way beyond the range of visible light. Instead of di-
rectly detecting color, by means of a two-step process,
the camera first records thermal information and sub-
sequently, the thermal information is displayed in the
form of an image such that it is amenable to visual
interpretation. Images are represented using a false
color representing the difference in temperature to
easily analyse a thermal image visually. Iron palatte
is the most commonly used color palatte with the
coldest and hottest areas being connoted as black and
white respectively. In the said palate, blue and pur-
ple indicate slightly hotter areas, whereas mid-range
temperatures are represented as red, orange and yel-
low. A sample image is shown in Fig. 1. Owing to
the relative nature of the presentation, a color does not
map to a particular temperature. Thus, in two differ-
ent image, the same color may represent two different
temperature. e.g. black on a thermal image may rep-
resent 0 degree Celsius whereas on another, it may
represent 25 degree Celsius. The significance of the
colors only implies a relative separation of hotter or
colder region, allowing one to easily distinguish be-
tween hottest and coldest parts. Recorded videos us-
ing FLIR ONE provides only color annotated images
of heat.
3.3 Software Architecture
We have exploited several features of FLIR ONE into
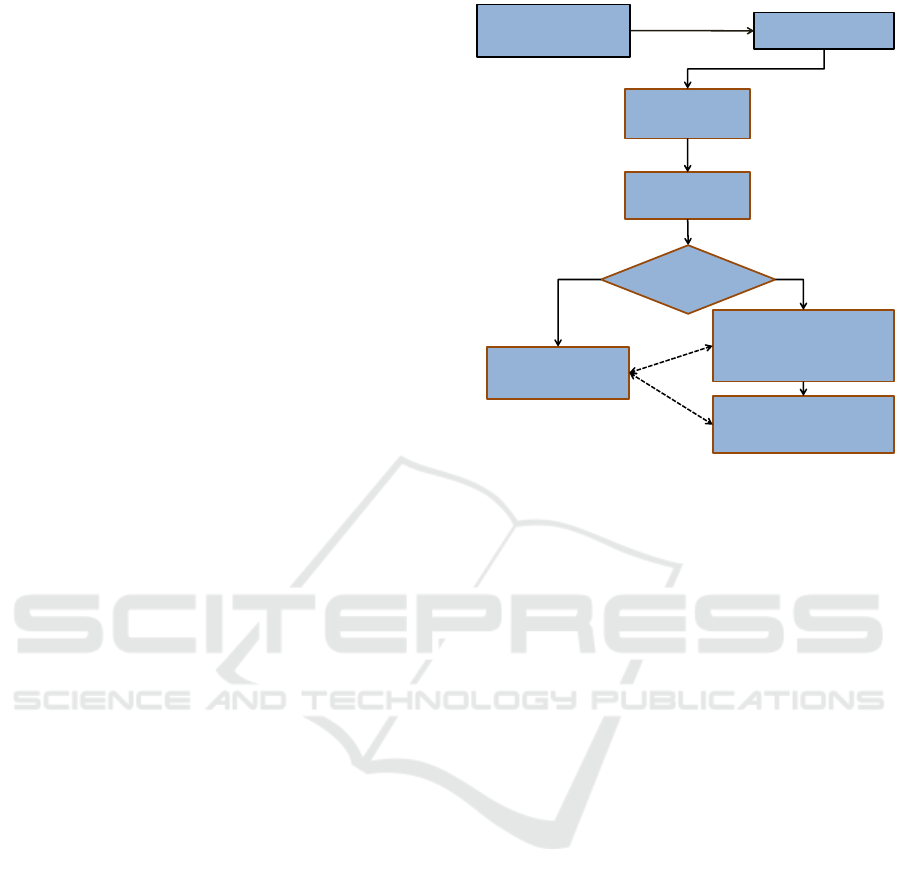
our proposed method. The proposed system block
diagram is shown in Fig. 2. FLIR ONE is placed
in front of machines under inspection and thermal
videos are captured using smart-phone application.
The video recording is continued until the heat is visi-
ble on the screen after powering off the machine. Hot-
ter regions are segmented out. Flow of heat for ev-
ery region is analysed throughout the captured video
duration. Each hot segment is broken into multiple
buckets such that each bucket is aligned towards a
particular direction. Total number of buckets would
depend on corresponding contour shape and size. The
analogy is to keep the total number of buckets as high
as possible but with a minimum length of perimeter
Segmentation
Contour
detection
Feature
Extraction
Store for
comparison
Tracking of each
segment from key
frame
Compare heat flow
with key frame
false
true
Flow of thermal
image frames
Key
Frame?
Figure 2: System Flow Diagram.
to identify any small changes in contour towards any
direction. Bucketing method is explained in Sec. 4.3.
The change in heat flow is governed by law of physics
and thus spreads in heated segments are not random.
This phenomenon motivated us to use combination of
perimeter and area towards a small range of direc-
tions (for one bucket) to find out changes in shape
of heated regions though perimeter and area are in-
dependently non-invariant features of shape. There
are possibilities where perimeter or area fails to de-
tect any changes but such cases would not occur due
to nature of heat flow. Features are tracked and com-
pared throughout entire captured duration to measure
thermal flow. The change in heat flow is governed by
second law of Thermodynamics and our experimen-
tal results could not found much difference in heat
flow between two consecutive frames when we cap-
ture video even with very low frame rates like near
to 6 fps. Therefore the comparison and measurement
are executed based on key frames which are consid-
ered after some intervals. Intensity is another feature
that helps to identify uniform heat increase without
contour changes.
4 FEATURES
Frames are decoded and processed in a sequential
way. Iron color palette is used to represent hotter and
colder areas of an image as described above and stor-
age format is in three channel colour format (RGB).
Temperature is a single channel quantity represented
ThermoFlowScan: Automatic Thermal Flow Analysis of Machines from Infrared Video
639
with three channel pseudo colour format for better
visual impact on human eyes. Therefore separation
between hot and cold regions must be decided by
chroma and luminance should have very little effect.
HSV (Hue, Saturation and Value) is the representation
where chroma is mapped into single channel called
hue. HSV color representation is used for segmen-
tation. RGB to HSV conversion is performed as de-
scribed by Alvy (Alvy, 1978).
We defined combinational features for every seg-
ment for unique identification, result in stable track-
ing of each segment with accurate flow calculation.
Features are extracted on the gray scale image. Con-
version to gray scale is achieved by Eq. (1) (Rafael
and Richard, 2006).
Y = 0.299R + 0.587G + 0.114B (1)
Where Y = gray intensity value and R, G, B repre-
sents the red, green and blue channel intensity values
respectively.
Heat source is the hottest region in a segment.
Therefore hottest point in a segment would not change
very fast due to the nature of heat flow. This motivates
us to use the hottest point or local maxima to track re-
gion of interest (ROI). Perimeter and area towards ev-
ery bucket help to measure heat flow direction as al-
ready mentioned in Sec.3.3. Average intensity helps
to identify uniform heat increase even without con-
tour changes.
4.1 Segmentation
Segmentation, in the parlance of image processing, is
the process of separating a digital image into multiple
segments (contiguous group of pixels) and represents
the image in a way that is more meaningful and eas-
ier to analyse. Heated areas in a thermal image are of
our ROI’s and segmentation is used to segregate out
hot areas. Every hot segment in a thermal image is
having temperature distribution due to heat flow re-
sulting changes of color gradually. Therefore a single
segment is not every time suitable to represent a big-
ger heated region. Multiple level of segmentation is
used for such kind of scenario which generates mul-
tiple contours within one contour to segregate multi-
ple level of heated segments. Selected hue and sat-
uration ranges from HSV representation are used for
segmentation. Value field is ignored because it is as-
signed the max value from RGB channel as described
in the algorithm. The effect of discarding values on
HSV planes is experimentally verified. Brightness of
a thermal image is varied within a range of -70 to
+70 which eventually change the value field on HSV
Brightness -70
Brightness 70
150
200
250
300
350
400
450
500
1
7
13
19
25
31
37
43
49
55
61
67
73
79
85
91
97
103
109
115
121
127
133
139
145
151
157
163
169
175
181
187
193
199
Euclidean Distances
from Origin
Number of Points on Perimeter
Original
Brightness 70
Brightness -70
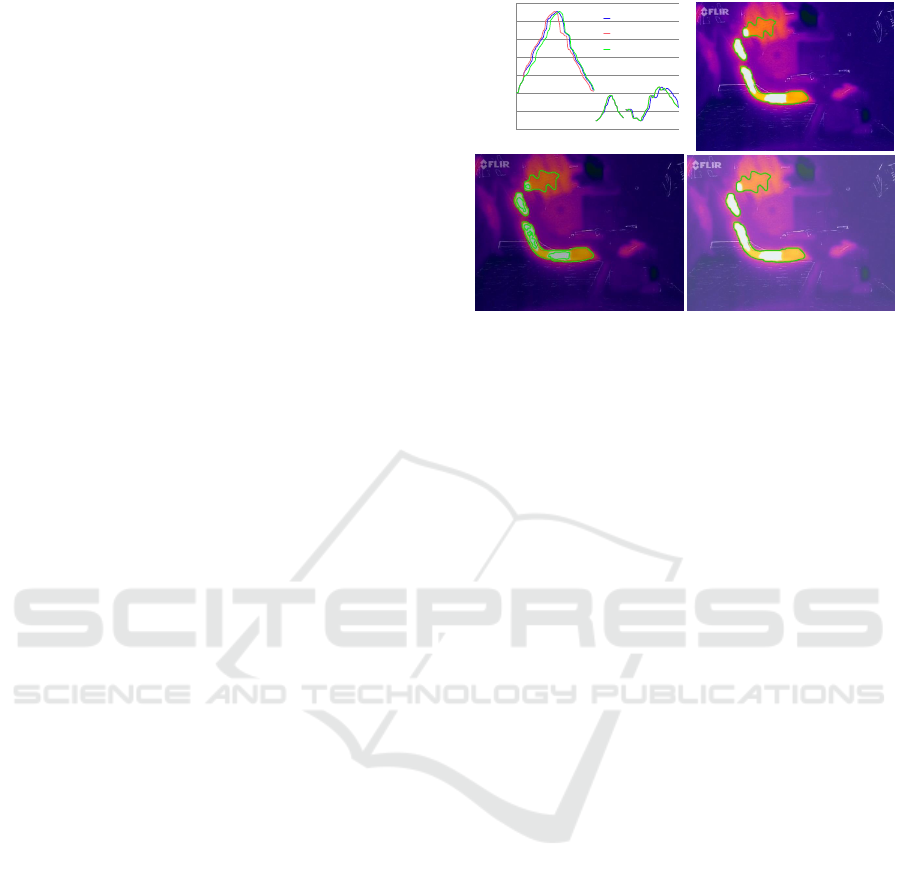
Figure 3: Segmentation with varying brightness and satura-
tion.
plane. Segmentation process shows almost non in-
variant to the change of value. The graph in Fig. 3
represents Euclidean distances of points lies on the
contours with different values of brightness and im-
ages shows the detected segments. The overlapping
curves represent similar segmented contour shapes.
Particular color segment are chosen based on the
color representation on thermal images. The selected
color segment is represented on the Fig. 4. The se-
lected color segment is used as threshold parameters
for hot area segmentation. Multilevel segmentation
uses multiple threshold parameters from hue and sat-
uration selection. Two level segmentation is shown
Fig. 1.
It is interesting to note that, driven by the relative
scale in temperature presentation, while significant
heating up occurs in the system the coldest zone in the
frame (likely to be far outside the actual system con-
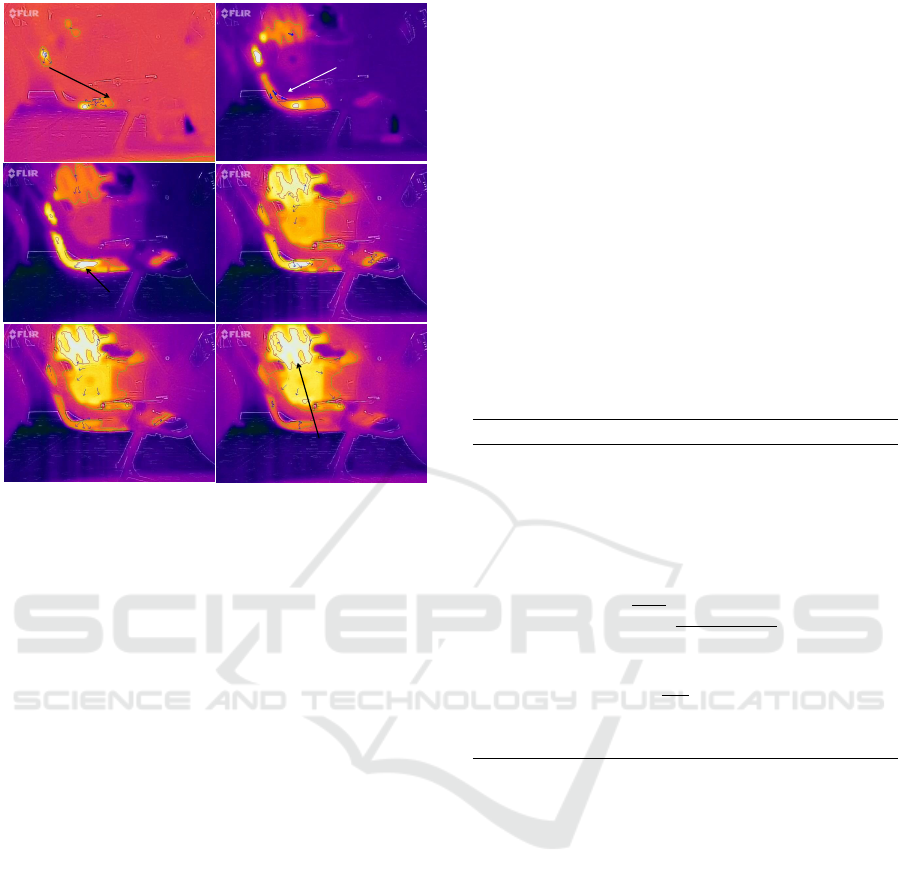
cerned) turns darker. This can be seen, e.g. between
the transition from the frame with time tag of ’18.667
sec’ and ’1 min 39 sec’ in Fig. 6. Governed by the
physical reasoning that the coldest zone, away from
any proximal heat transfer effect of the sources, does
not undergo significant temperature change, hence,
may serve as a mechanism to counter the relativity ef-
fect in color depiction. So, we can benchmark against
the coldest zone and can accordingly modify the ther-
mal contour for better segmentation.
Segmentation produces heated regions which are
our ROI. Satoshi & KeiichiA (Satoshi and KeiichiA,
1985) presented contour detection algorithm using
topological structural analysis of digitized binary im-
ages by border following, we make use of same
method to detect contour of all ROIs.
VISAPP 2017 - International Conference on Computer Vision Theory and Applications
640

Hue range for
heated areas
Figure 4: Hue range for thermal segmentation on HSV
palne.
4.2 Tracking
Heat flow measurement requires tracking heated re-
gions for long duration. Tracking requires unique
identification of every heated region for entire inspec-
tion duration which is quite long in case of steady
heat growth and decay. Local maximum heat point
in every segment is used for tracking corresponding
segment for entire inspection duration. Many time
heats are spread in a way that there exists a small
region which represents most heat instead of a sin-
gle point. The most heat region is basically the heat
source which does not changes rapidly. We exploit
this phenomenon for tracking a segment. Centroid
of most heat region is used in tracking. Centroid is
defined as the pixel with average coordinate values of
pixels on perimeter of mostly heated region inside one
segment. So this pixel can be treated as local maxima.
Centroid calculation follows Equ. 2.
C
x
=
∑
n
x=1
P
x
n
, C
y
=
∑
n
x=1
P
y
n
(2)
Where P is a point on perimeter with x, y coordi-
nates are P
x
, P
y
and n is the total number of points
on perimeter.
Centroids are tracked through the calculation of
minimum Euclidean distances from previous key
frame (shown in Algo. 1). One advantage of track-
ing through centroid is centroids of local maxima do
not move much between two successive key frames,
results robust tracking.
Algorithm 1: Tracking of Heat segments.
1: procedure TRACK
2: loop: [for all Centroid (C) ∈ current frame]
3: Find Min(C, C
key
) [for all Centroid (C
key
) ∈
key frame]
4: end loop
Bucket [0]
Bucket [N-1]
Average
distance
between
perimeter
and centroid
is store for
every bucket
Entire perimeter is
broken into N equal
length buckets
One heated
contour of
circular shape
Equal length
Equal length
Figure 5: Bucket formation.
Area, perimeter and average intensity are calcu-
lated for every segment. Area is defined as number
of pixels inside of a segmented region. Perimeter is
defined as total number of pixels on a contour of any
segmented area. Average intensity is the average gray
value of pixels within one segment and calculated us-
ing Equ. 3.
I
avg
=
∑
m
p=1
I
p
m
(3)
Where I
p
denotes the gray intensity of point p ∈ m
where m is total number of points inside the segment.
4.3 Bucket Formation
Heat flow measurement requires identification of di-
rections where heat spread either increment or decre-
ment. These directions are infinite theoretically, but
feasible implementation requires directions to be in
finite numbers. Therefore directions are calculated
by dividing entire perimeter of a segmented area
into multiple numbers of directions called buckets.
Perimeter is divided into small angles and stored in
each bucket. Angles and Euclidean distances from
centroid are calculated for each perimeter point be-
longs to a bucket. The average Euclidean distance
will represents present heat status of that bucket. This
calculation is repeated for every bucket of all seg-
ments. A bucket is broken into multiple buckets when
perimeter of corresponding bucket will grow with
heat spread. Bucket formation is shown visually on
Fig. 5.
Signature for every ROI is defined with area,
perimeter, centroid of most heated region (local max-
ima), bucketing and average intensity for unique iden-
tification.
ThermoFlowScan: Automatic Thermal Flow Analysis of Machines from Infrared Video
641
18.667 sec
11 min
38.67 sec
30 min
40 sec
44 min
53.33 sec
54 min
10.67 sec
Graph plot is
given for
this contour
Hottest region is
reduced after
powered off.
Heat is moved towards the
heat sink at cooling down
1 min 39 sec
2 segments
are merging
Figure 6: Motor Bike data set.
4.4 Key Frame
Transfer of heat is the flow of thermal energy be-
tween physical components in a system, whereby the
internal energy of the system gets changed. In a sys-
tem, the rate of heat transfer between two components
or points, depends on the temperature difference be-
tween the respective components or points and the in-
tervening medium of heat transfer. The direction of
such flow of thermal energy is from higher tempera-
ture to lower temperature and the governing physics
of the process is known as the second law of thermo-
dynamics. Thermal equilibrium is reached when the
bodies involved in heat transfer and the surrounding
reach the same temperature. The three fundamental
modes of heat transfer are conduction, convection and
radiation. Heat transfer will result in the increase in
entropy of the collection of systems. So the heat prop-
agation on machine is dynamic process and rate varies
with time. We found very minor heat changes be-
tween two consecutive frames when we captured con-
tinuous video through FLIR ONE. Therefore calcula-
tion is performed with reference of key frames rather
every consecutive frames. Key frames are chosen af-
ter certain intervals. All other frames are compared
with last stored key frame.
5 HEAT FLOW ANALYSIS
Analysis is performed in terms of comparing signa-
tures and flow measurements between current and
previous key frame. All measurements are performed
in pixel unit. Therefore the changes are not possible
in absolute unit rather in percentage changes. Area,
perimeter and average intensity changes are recorded.
Average intensity play an important role for identify-
ing the event where changes in contour or shape are
negligible but the region gets heated up slowly and
uniformly with time.
Heat flow is measured by the changes of average
Euclidean distances of each bucket. Every bucket are
aligned with specific direction, so any changes of Eu-
clidean distance on a bucket represent a change of
heat towards the aligned direction.
Algorithm 2: Thermal Flow Measurement.
1: procedure HEATFLOW
2: loop: [for all Buckets ∈ segment]
3: J
Dist
← 0
4: loop: [for all point J ∈ Bucket]
5: Y
di f f
← (J.y −C.y)
6: X
di f f
← (J.x −C.x)
7: θ ← (tan
−1
Y
di f f
X
di f f
)
8: J
Dist
← J
Dist
+
q
X
2
di f f
+Y
2
di f f
9: end loop
10: HeatFlow
b
←
J
Dist
N
[N is the total number of
points in the bucket]
11: end loop
6 EXPERIMENTS
In this section we evaluate our presented system by
testing on machine and prove that our system is ca-
pable to measure heat flow from thermal image. We
analyse our proposed model using real thermal im-
ages of running machines that generate heat. In
our experiments we concentrate to capture long du-
ration videos to analyse the heat spread over time.
Proposed system is implemented on personal com-
puter but it can directly be ported on any smart-
phone using only cpu. A demo video is uploaded at
https://youtu.be/Slj3Xw3XDsg to demonstrate the ca-
pability of the proposed system.
6.1 Evaluation with Bike engine
We measured thermal flow on motor bike engine. The
bike was powered on for 227 sec and heat flow of
VISAPP 2017 - International Conference on Computer Vision Theory and Applications
642

0
20
40
60
80
100
120
0 100 200 300 400 500
Flow Length (pixel)
Time (sec)
Bucket 3
Bucket 10
Bucket 11
Two heated segment merged
and sudden rise on length
Figure 7: Thermal flows for 3 buckets for bike data.
smoke pipe is measured for 55 min 13 sec. Detected
contour and measured flow directions are presented
in Fig. 6. Calculated thermal flow for 3 buckets for
500 sec are presented on Fig. 7. Bucket 10 shows a
sudden increment at 99.16 sec which is the result of
merging two contours towards that direction. Heat is
flowed from engine towards heat sink after switching
off the engine (shown on Fig. 6), which could be an
indicative for predictive maintenance.
6.2 Evaluation with Heated Iron
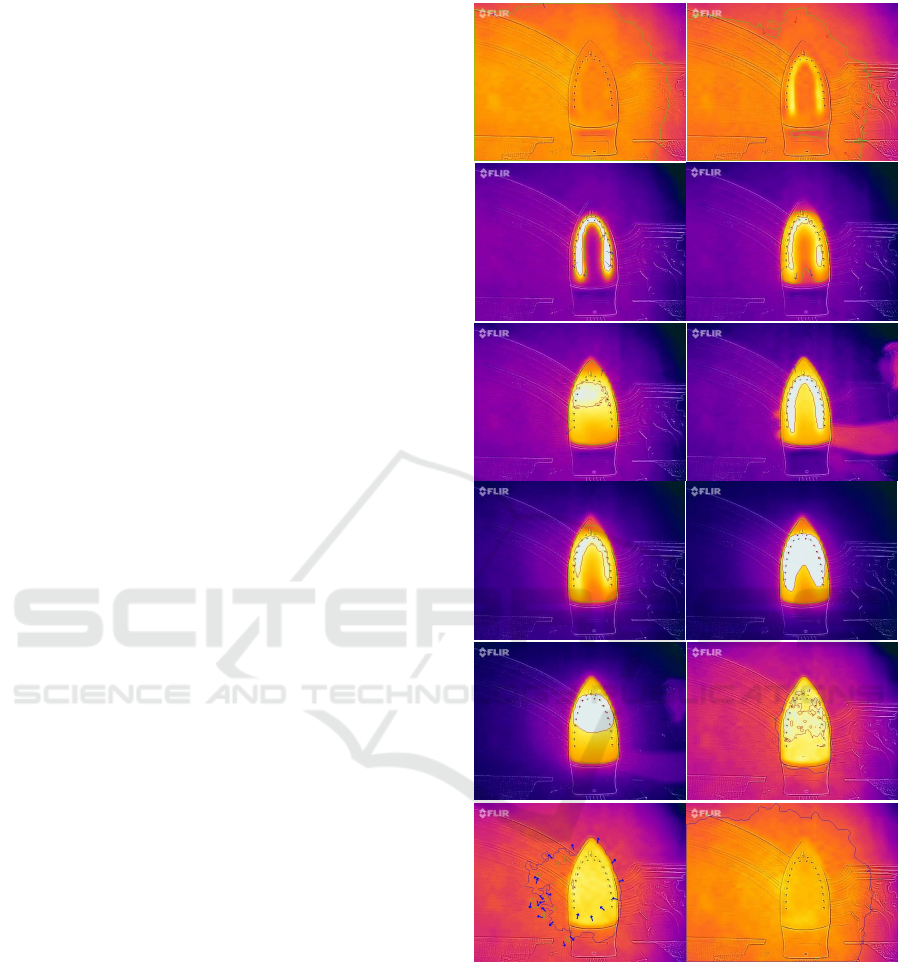
Figure 8 represents snapshots of images with detected
contours thermal flows of a house hold pressing iron.
The entire test duration is 40 min 49 sec. Heat levels
are incremented multiple times which is immediately
detected on the flow measurement. Spreading of heat
from heated iron body to the air is also detected by
heat flow directions (22 min 39.17 sec onwards) and
uniform heat distribution is also measured after the
iron is cooled down by average intensity and area.
7 CONCLUSION
We presented a cost effective system for heat flow
analysis of machines in autonomous and unobtru-
sive way with the use of FLIR ONE imaging cam-
era. The system captures thermal video and track
heated regions continuously. Heat flow analysis pre-
sented in the form of percentage changes of heat in all
direction. Proposed method is capable of detecting
and measuring any sudden heat flow, uniform heat-
ing from any heat source, merging of multiple heat
sources etc. Presented results showed the above men-
tioned measurements and verify the claims. The sys-
tem is tested with many machines that are commonly
available in houses and results from two different tests
are presented. The measured attributes are expected
to help for predictive maintenance for industrial ma-
chines and tolls that generates heat. Predictive or pre-
ventive maintenance for industrial machines are taken
as the future scope of the work.
REFERENCES
Al-Habaibeh, A. and Robert, P. (2003). An autonomous
low-cost infrared system for the on-line monitoring
of manufacturing processes using novelty detection.
In International Journal of Advanced Manufacturing
Technology.
Alvy, R. S. (1978). Color gamut transform pairs. In Spe-
cial Interest Group on Graphics and Interactive Tech-
niques (SIGGRAPH’78).
ASHISH and VIJAY (2014). Review on thermal image pro-
cessing tecniques for machine condition monitoring.
In International Journal.
Bagavathiappan, S., Saravanan, T., Philip, J., Jayakumar, T.,
Raj, B., Karunanithi, R., Panicker, T. M. R., Korath,
M. P., and Jagadeesan, K. (2009). Infrared thermal
imaging for detection of peripheral vascular disorders.
In Journal of Medical Physics.
Clough, D., Fletcher, S., Longstaff, A. P., and Willoughby,
P. (2012). Thermal analysis for condition monitoring
of machine tool spindles. In Journal of Physics: Con-
ference Series.
Deshpande, P., Reddy, V. R., Saha, A., Vaiapury, K., De-
wangan, K., and Dasgupta, R. (2015). A next genera-
tion mobile robot with multi-mode sense of 3d percep-
tion. In IEEE International Conference on Advanced
Robotics (ICAR).
Eftekhari, M., Moallem, M., Sadri, S., and Hsieh, M.
(2013). A novel indicator of stator winding inter-turn
fault in induction motor using infrared thermal imag-
ing. In Infrared Physics and Technology.
Kaczmarek, M. and Ruminski, J. (2009). Thermal imaging
of skin temperature distribution during and after cool-
ing: In-vitro experiments. In 4th European Confer-
ThermoFlowScan: Automatic Thermal Flow Analysis of Machines from Infrared Video
643
ence of the International Federation for Medical and
Biological Engineering.
Omar, O., Jason, C., and Avideh, Z. (2014). Automatic
generation of 3d thermal maps of building interiors.
In ASHRAE Trans.
Pal, A., Dasgupta, R., Saha, A., and Nandi, B. (2016).
Human-like sensing for robotic remote inspection and
analytics. In Wireless Personal Communications: An
International Journal.
Rafael, C. G. and Richard, E. W. (2006). Digital Image
Processing. Prentice-Hall, Upper Saddle River, NJ,
USA, 3rd edition.
Rajoub, B. A. and Zwiggelaar, R. (2014). Thermal facial
analysis for deception detection. In IEEE Trans. on
Information Forensics and Security.
Rangel, J., Soldan, S., and Kroll, A. (2014). 3d thermal
imaging: Fusion of thermography and depth cameras.
In 15th International Conference on Quantitative In-
fraRed Thermography.
Saha, A., Dewangan, K., and Dasgupta, R. (2016). 3d ther-
mal monitoring and measurement using smartphone
and ir thermal sensor. In 11th Joint Conference on
Computer Vision, Imaging and Computer Graphics
Theory and Applications.
Satoshi, S. and KeiichiA, A. (1985). Topological structural
analysis of digitized binary images by border follow-
ing. In Computer Vision, Graphics, and Image Pro-
cessing (CVGIP’85).
Starman, S. and Matz, V. (2011). Automated system for
crack detection using infrared thermographic testing.
In Journal of Physics: Conference Series.
Vidas, S., Moghadam, P., and Bosse, M. (2013). 3d ther-
mal mapping of building interiors using an rgb-d and
thermal camera. In IEEE International Conference on
Robotics and Automation (ICRA’13).
Weinmann, M., Leitloff, J., Hoegner, L., Jutzi, B., Stilla, U.,
and Hinz, S. (2014). Thermal 3d mapping for object
detection in dynamic scenes. In ISPRS Annals of the
Photogrammetry, Remote Sensing and Spatial Infor-
mation Sciences.
No power
mode shows a
uniform heat
distribution
with a bigger
contour
Reducing
contour with
immediate
heat
detection
just after
power on
10.67 sec
12.16 sec
16.16 sec
25.67 sec 52 sec
1 min 15 sec
2 min 12 sec
1 min 54.5 sec
Temperature
increased and
detected
immediately
with hottest
contour
Temperature
increased
again and
detected
heat flow
Powered
Off
22 min
39.17 sec
Heat flow
started
spreading
while
cooling
down
25 min
20 sec
Heat is
spreading and
flows are
detected
40 min
22.33 sec
Uniform
heat
distribution
after cool
down
Figure 8: Iron data set.
VISAPP 2017 - International Conference on Computer Vision Theory and Applications
644
