Physical and Numerical Simulation of Contact Mechanics of
Spark-eroded Tool Steel with Controlled Roughness
Ignacio Cueva
1
, Miguel Ángel Ramírez
1
, Carlos Gabriel Figueroa
2
, Hadassa Amelia Juárez
1
and
Rafael Schouwenaars
1*
1
Facultad de Ingeniería, Departamento de Materiales y Manufactura
Universidad Nacional Autónoma de México, Coyocacán, 04510, México.
2
Facultad de Ingeniería, Departamento de Materiales y Manufactura
Universidad Nacional Autónoma de México, Via de la Innovación 410,
PIIT Apodaca, Nuevo Leon, Mexico.
Keywords: Spark Erosion, Surface Roughness, Load-Displacement Curve, Contact Measurement, Finite Elements.
Abstract: Spark erosion is a convenient process to produce dies with complex shapes from hard tool materials used
under severe contact conditions. A controlled surface roughness can be produced by systematic variation of
the milling parameters. This is used in the present work to prepare surfaces for contact mechanics testing and
simulation, as will be shown by a newly developed method which performs between contact measurements
and finite element simulations of experimentally characterised rough surfaces. In the experiment, the surface
roughness of the tool steel is measured by means of optical profilometry. Using an instrumented indentation
stage, contact is made with a spherical surface and the force-displacement curve measured. The surface
geometry is measured again to detect the effect of plastic deformation. To execute the numerical simulation,
the measured surface topography is transferred, one on one, to a finite element mesh with 237169 surface
nodes. The method allows to perform precise simulation of the contact of real surfaces, instead of approximate
or numerically simulated ones, limited only by the spatial resolution of the measurement.
1 INTRODUCTION
Friction and wear of tool materials are of primary
concern in the design and operational of industrial
metal forming processes. Despite more than a century
of intensive research in this field, it can be stated that
a theoretical explanation of friction and wear has not
yet been achieved. A first problem to be solved is that
of the contact mechanics of rough surfaces. From the
first appearance of surface profilers, it was
recognised that roughness must be studied from the
viewpoint of random process theory (Whitehouse and
Archard, 1970; Nayak, 1971). A successful
incorporation of this theory into a contact models was
made by (Greenwood and Williamson, 1966), who
considered a profile consisting of spherical asperities
with a Gaussian or exponential height distribution.
These early studies considered “conventional”
geometries, in the sense that it was assumed that all
the higher moments of the power spectral density
exist. More recently, the concept of fractal or
self-affine surfaces has gained popularity (Majumdar
and Bhushan, 1990; Majumdar and Bhushan, 1991).
Using numerical simulation, it is very easy to adapt
the classical GW-model to these assumptions.(Müser
et al., 2017) present a recent review of existing
models which are either based on further refinements
of the GW-model or use finite elements, boundary
elements or molecular dynamics. The latter three
provide a more detailed description of the surface
topography. Recent modifications of asperity-based
models include new descriptions of the geometry and
elastoplastic behaviour (Wen et al., 2018; Yuan et al.,
2017), but rely on a statistical analysis of the surface,
which inherently implies significant simplification of
the real geometry, which is used in this work.
Publications on experimental contact mechanics
are relatively rare as compared to studies on
simulations and generally rely on certain statistical
parameters characterising the roughness, not on
detailed analysis of the total geometry. One
interesting exception is the study by (Bennett et al.,
2017), who used 3D-printing to create surfaces with a
180
Cueva, I., Ramírez, M., Figueroa, C., Juárez, H. and Schouwenaars, R.
Physical and Numerical Simulation of Contact Mechanics of Spark-eroded Tool Steel with Controlled Roughness.
DOI: 10.5220/0008187301800183
In The Second International Conference on Materials Chemistry and Environmental Protection (MEEP 2018), pages 180-183
ISBN: 978-989-758-360-5
Copyright
c
2019 by SCITEPRESS – Science and Technology Publications, Lda. All rights reserved

prescribed topography and observed the contact area
through a transparent contacting surface.
Apart from the latter example, in general it is not
self-evident to create surfaces with controlled random
roughness characteristics. Many surface preparation
techniques will generate patterns which are either
periodic or strongly anisotropic. Isotropic randomly
rough surfaces with controlled roughness parameters
have been prepared by sand blasting,
electrodeposition and spark erosion. Several authors
have shown how the control of electrical discharge
parameters can produce surfaces with controlled
roughness and fractal parameters (Singh et al., 2004;
Deltombe et al., 2014).
2 EXPERIMENTS AND
SIMULATIONS
Commercial D2 steel was prepared by spark erosion
using an EDM444M3-L numerically controlled
electrical discharge equipment with a 15 mm
diameter electrolytic copper electrode. For the
example presented in this text, a depth of 0.1mm was
eroded using 10 ms pulses of 0.8A with a 65% dead
time between pulses.
Surface topography was measured by a Nanovea
optical profilometer using Chromatic Confocal
Technology before and after contact testing. Contact
testing was performed on the same system by
pressing a spherical stainless steel stylus of 2.5mm
radius onto the measured surface at a velocity of 0.25
N/min until reaching a load of 0.5N. According to
Hertz contact theory, this allows to maintain the bulk
of the sample within the elastic region. The
measurement of the surface roughness and surface
indentation were centred by creating and indentation
in a soft copper specimen and calculating the distance
between the centre of the stylus and the centre of the
optical pen. This analysis also allows verifying any
possible damage to the spherical surface of the stylus
by measuring the surface profile of the indentation
made in the copper sample.
The measured surface was analysed by means of
earlier developed software to determine the fractal
dimension (Schouwenaars et al., 2017), roughness
and height distributions. The measured geometry was
introduced into the ABAQUS Explicit Finite Element
Package by creating a mesh with a smooth surface
and substituting the height values of the surface
nodes with the measured ones. The surface roughness
was scaled in such a way that the maximum height
difference was equal to 1/2 of the size of the elements
used in the contact zone. This procedure is valid if all
results are scaled accordingly.
3 RESULTS AND DISCUSSION
The mean square roughness of the surface analysed in
this work was equal to 5.8
as determined by the triangular prism method, was
equal to 2.8. The bearing curve, i.e. the empirical
(cumulative) distribution of the surface heights, is
given in Figure 1, both before and after the contact
test. Small differences between both curves indicate
that some plastic deformation occurred during the
test.
Figure 1: Cumulative height distribution before and after
contact testing and Gaussian fit.
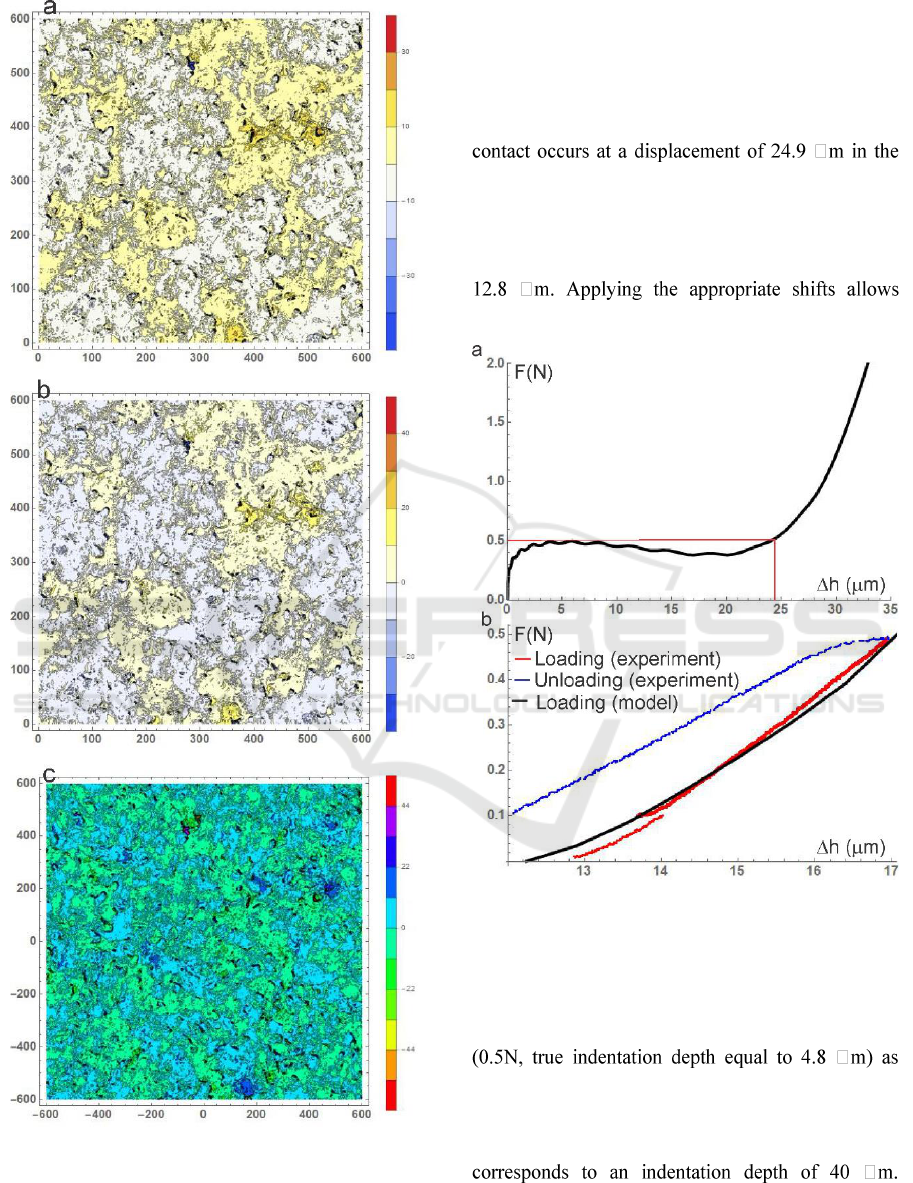
Figure 2 presents the measured surface heights
before (Figure 2a) and after (Figure 2b) the test.
Figure 2c) shows the difference of the height profile
before and after testing. To eliminate small shifts in
the horizontal position of the measurements, a
least-squares procedure was used. No clear pattern
can be observed in Figure 2c, indicating that plastic
deformation was very small. A low pass filter applied
to the three images in Figure 2 revealed that the
surface shows a broad maximum in the upper-right
quarter of the measured zone which was slightly
depressed as the consequence of plastic deformation
during the test. This small difference is also seen in
the height distributions of Figure 1.
Physical and Numerical Simulation of Contact Mechanics of Spark-eroded Tool Steel with Controlled Roughness
181

Figure 2: a) shows the surface profile before testing, b)
shows the same after testing, c) gives the height differences
due to the indentation. The difference pattern is almost
random, with a slight tendency to negative values,
indicating only small plastic effects were present.
An example of the finite element results is given
in Figure 3. Figure 3a shows the raw
load-displacement curve after scaling. Some initial
fluctuations are due to the explicit integration
scheme, the small load before contact corresponds to
the weight of the contacting body. The point of first
model.
Figure 3b shows the experimental loading and
unloading curves, with evidence of a small plastic
deformation, as the unloading curve is shifted to the
left. The point of first contact occurs at approximately
comparing model to experiment.
Figure 3: a) shows the modelled curve without correction
for dynamic effects and instrument weight. b) compares the
corrected curve to the measured ones. The shift applied to
obtain Figure 3b is marked by the red reference lines in 3a.
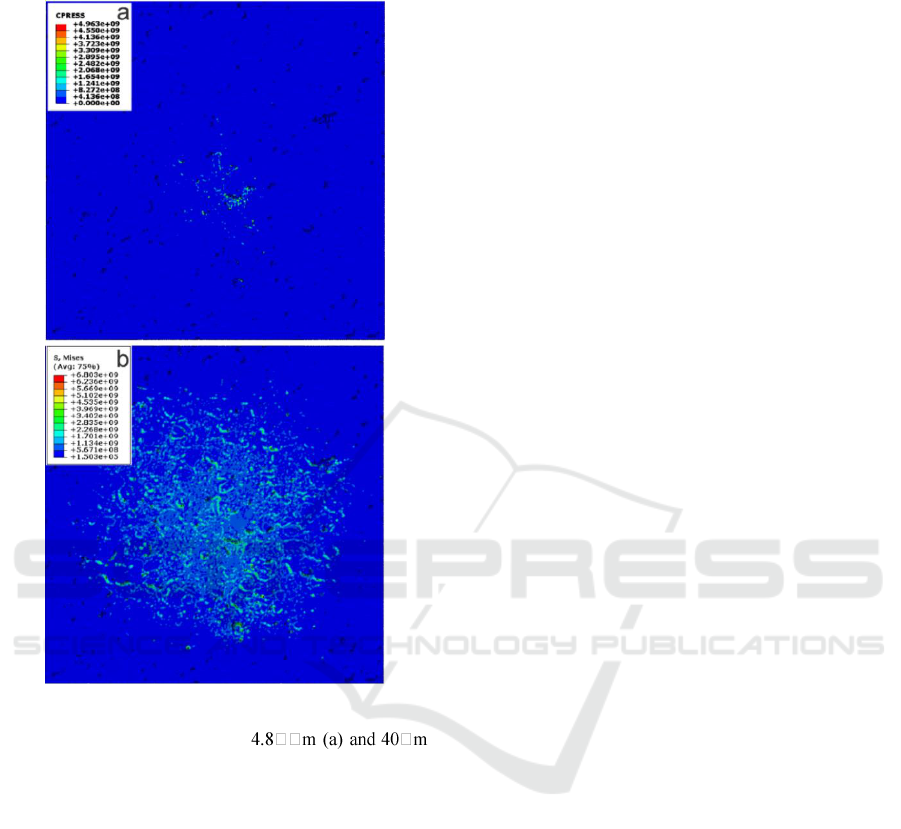
Figure 4 shows the contact pressure distribution.
4a corresponds to the situation at maximum load
shown in Figure 3b. It is seen that only a small
number of asperities contacts the spherical stylus. 4b
is added to provide a clearer view of how such a
contact distribution looks at higher loads. The image
Evidently, considerable plastic deformation would
occur at these loads, which is not taken into account
MEEP 2018 - The Second International Conference on Materials Chemistry and Environmental Protection
182

in the present simulations but can be incorporated
into future experiments and models.
Figure 4: Contact pressure distribution as predicted by the
model at an indentation depth of
(b).
4 CONCLUSIONS
Spark erosion can generate randomly rough surfaces
with controlled roughness and a high fractal
dimensions. Combining standard equipment for
instrumented indentation with an optical surface
profiler mounted on the same console, precise
measurements of contact load-displacement curves
can be combined with a detailed analysis of the
surface topography before and after testing.
Using purposely developed software, the
measured surface can be superposed on a pre-existing
finite element mesh. The measured geometry and the
finite element geometry are the same, the only
limitation is the spatial resolution of the
measurement. This is a significant innovation and can
be used in future, more extensive studies in which the
surface roughness will be varied through systematic
analysis of the electric discharge parameters.
ACKNOWLEDGEMENTS
Financial support from DGAPA projects PAPIIT
IN114718 and PAPIME PE111018 is acknowledged.
MA Ramírez and CG Figueroa thank DGAPA for
their post-doctoral fellowships. HA Juárez thanks
CONACYT for her master’s scholarship.
REFERENCES
Bennett, A.I., Harris, K.L., Schulze K.D., Urueña, J.M.
McGhee A.J., Pitenis A.A., Müser M.H., Angelini,
T.E., Sawyer,W.G., 2017. Contact measurements of
randomly rough surfaces. Tribology Letters 65, 134.
Deltombe, R., Kubiak, K. J., Bigerelle, M., 2014. How to
select the most relevant 3D roughness parameters of a
surface. Scanning: The Journal of Scanning
Microscopies, 36, 150.
Greenwood, J.A., Williamson, J.B.P., 1966. Contact of
nominally flat surfaces. Proceedings of the Royal
Society of London A, 295, 300.
Majumdar, A., Bhushan, B., 1990. Role of fractal geometry
in roughness characterization and contact mechanics of
surfaces. Journal of Tribology, 112, 205.
Majumdar, A., Bhushan, B., 1991. Fractal model of
elastic-plastic contact between rough surfaces. Journal
of Tribology, 113, 1.
Müser M.H., Dapp W.B., Bugnicourt R., Sainsot P.,
Lesaffre N., Lubrecht T.A., Persson B.N., Harris K.,
Bennett A. et al., 2017. Meeting the contact-mechanics
challenge. Tribology Letters. 65, 118.
Nayak, P.R. 1971. Random process model of rough
surfaces. Journal of Lubrication Technology, 93, 398.
Schouwenaars, R., Jacobo V.H., Ortiz A., 2017. The effect
of vertical scaling on the estimation of the fractal
dimension of randomly rough surfaces. Applied
Surface Science. 425, 838.
Singh, S., Maheshwari, S., Pandey, P.C., 2004. Some
investigations into the electric discharge machining of
tool steel using different electrode materials. Journal of
materials processing technology, 149, 272.
Wen Y, Tang J, Zhou, W., Zhu, C., 2018. An improved
simplified model of rough surface profile. Tribology
International 125 75.
Whitehouse, D.J., Archard, J.F., 1970. The properties of
random surfaces of significance in their contact.
Proceedings of the Royal Society of London. A. 316,
97.
Yuan Y, Cheng Y, Liu, K., Gan, L., 2017. A revised
Majumdar and Bushan model of elastoplastic contact
between rough surfaces. Applied Surface Science. 425,
1138.
Physical and Numerical Simulation of Contact Mechanics of Spark-eroded Tool Steel with Controlled Roughness
183
