
Automated Detection of Defects on Metal Surfaces Using Vision
Transformers
Toqa Alaa
1
, Mostafa Kotb
1
, Arwa Zakaria
1
, Mariam Diab
1
and Walid Gomaa
1,2
1
Department of Computer Science and Engineering, Egypt-Japan University of Science and Technology, Alexandria, Egypt
2
Faculty of Engineering, Alexandria University, Alexandria, Egypt
Keywords:
Vision Transformers, Classification, Localization, Convolution Neural Networks, GC10-DET, NEU-DET,
Multi-DET.
Abstract:
Metal manufacturing often results in the production of defective products, leading to operational challenges.
Since traditional manual inspection is time-consuming and resource-intensive, automatic solutions are needed.
The study utilizes deep learning techniques to develop a model for detecting metal surface defects using Vision
Transformers (ViTs). The proposed model focuses on the classification and localization of defects using a
ViT for feature extraction. The architecture branches into two paths: classification and localization. The
model must approach high classification accuracy while keeping the Mean Square Error (MSE) and Mean
Absolute Error (MAE) as low as possible in the localization process. Experimental results show that it can
be utilized in the process of automated defects detection, improve operational efficiency, and reduce errors in
metal manufacturing.
1 INTRODUCTION
The manufacturing and reshaping of metal surfaces
are critical processes in various industries, including
automotive, aerospace, and construction. These pro-
cesses often result in products with defects such as
cracks, dents, scratches, and other surface irregular-
ities. Such defects can compromise the structural
integrity and performance of metal products, posing
significant challenges to quality control and prod-
uct usability. Detecting and addressing these defects
is crucial to ensure the production of high-quality
metal products and to prevent costly operational fail-
ures (Wang et al., 2021; Murakami, 2019; Leibfried
and Breuer, 2006).
Traditionally, defect detection on metal surfaces
has relied heavily on manual inspection, where hu-
man experts visually examine surfaces for abnormal-
ities. This method is not only time-consuming and
labor-intensive but also highly subjective and incon-
sistent. It is prone to errors and often fails to detect
subtle defects that are not easily visible to the human
eye. Consequently, there is a compelling need for au-
tomated defect detection systems that can accurately
and efficiently identify and classify defects on metal
surfaces (Li et al., 2022; Fang et al., 2020).
Significant progress has been made in developing
automated defect detection techniques. Traditional
computer vision methods, such as edge detection,
thresholding, Hough transfrom, and image segmenta-
tion, have been extensively explored. These methods
typically rely on handcrafted features and rule-based
algorithms to identify defects based on predefined cri-
teria. Although these approaches have achieved some
success in detecting specific types of defects, they are
limited in their ability to handle complex and varied
defect patterns. They depend heavily on the expertise
of domain-specific engineers and lack the adaptabil-
ity to new or varied defect types (Sharifzadeh et al.,
2009).
With the advent of deep learning techniques and
the availability of large-scale annotated datasets, there
has been a paradigm shift towards employing neural
networks for automated defect detection. Convolu-
tional Neural Networks (CNNs) have demonstrated
remarkable performance in various computer vision
tasks, including image classification, object detec-
tion, and semantic segmentation. CNNs can auto-
matically learn discriminative features from raw in-
put data, making them well-suited for defect detec-
tion on metal surfaces. Several studies have success-
fully applied CNNs to detect defects on metal sur-
faces, achieving high accuracy and demonstrating the
36
Alaa, T., Kotb, M., Zakaria, A., Diab, M. and Gomaa, W.
Automated Detection of Defects on Metal Surfaces Using Vision Transformers.
DOI: 10.5220/0012936300003822
In Proceedings of the 21st International Conference on Informatics in Control, Automation and Robotics (ICINCO 2024) - Volume 2, pages 36-45
ISBN: 978-989-758-717-7; ISSN: 2184-2809
Copyright © 2025 by Paper published under CC license (CC BY-NC-ND 4.0)

potential of deep learning in this domain. For exam-
ple, U-Net-based CNN architectures have been ap-
plied to metal surface defect detection, showing im-
proved performance in capturing fine-grained details
of surface defects (Konovalenko et al., 2022).
Despite their promise, CNNs have limitations in
defect detection. They typically rely on local recep-
tive fields and hierarchical feature extraction, which
may not adequately capture long-range dependencies
and global context in images. Studies have shown
that varying lighting conditions can impact the perfor-
mance of neural network models in detecting defects,
which highlights the importance of surface illumina-
tion factor to ensure a reliable performance of models
(Maruschak et al., 2024).
This limitation is particularly critical when deal-
ing with complex defect patterns that span significant
portions of metal surfaces. Additionally, CNNs re-
quire large amounts of labeled training data, which
can be challenging and time-consuming to acquire for
specific defect types or rare occurrences (Tao et al.,
2018).
To address these limitations, we propose the use of
Vision Transformers (ViTs) for automated defect de-
tection on metal surfaces. ViTs, originally introduced
for image classification, (Dosovitskiy et al., 2020)
have gained attention for their ability to capture global
context and long-range dependencies through self-
attention mechanisms (Vaswani et al., 2017). This
makes them well-suited for capturing intricate defect
patterns on metal surfaces.
To address the limitations of the current datasets
used in metal surface detection, a new dataset called
Multi-DET is built. Current datasets don’t accurately
simulate real-world conditions, as metal surfaces typ-
ically have more overlapping and higher number of
defects per image. Our new dataset, Mult-DET, ad-
dresses these limitations by introducing diversity and
increased density per image.
The primary objectives of this research are
twofold: defect classification and defect localization.
Defect classification aims to accurately identify the
type and nature of each defect. Defect localization
aims to precisely predict the boundaries of each de-
fect, facilitating targeted treatment and repair. The
proposed model should be able to detect multiple de-
fects in the input image.
Leveraging the power of pre-trained ViTs on
large-scale image datasets like Imagenet, the pro-
posed model utilizes transfer learning to benefit from
the learned representations of ViTs, which capture
rich visual features. This pre-trained model is able to
effectively extract meaningful defect-related features
from raw metal surface images. So, we propose using
Vision Transformers and deep learning techniques to
automate defect detection on metal surfaces, aiming
to enhance product quality and reduce costly errors in
metal manufacturing.
The paper is organized as follows. Section 1 is an
introduction, offering an overview of the problem and
the undergoing research. Section 2 discusses related
work. Section 3 explores the used datasets and our
new dataset. Section 4 discusses the methodologies
used for defect detection and localization. Section 5
gives the experimental work to validate our approach
along with analyzing the results, illustrating as well
the limitations of our approach. Section 6 summa-
rizes our work and provides an outlook on future di-
rections.
2 RELATED WORK
Metal defects detection is a critical task in industrial
applications. Over the years, researchers have devel-
oped methods to identify and classify these defects
using machine learning and computer vision (Wang
et al., 2021). The advancement of these methods in-
creases the efficiency and accuracy of the process to
ensure quality and reliability of metal products in in-
dustries.
2.1 Traditional Approaches
Metal defects initially relied on manual inspection,
including Magnetic Particle Inspection (MPI), Ultra-
sonic Testing (UT), and Dye Penetrant Inspection
(DPI) (Lovejoy, 1993). While these approaches have
been fundamental in ensuring the quality of metals,
they come with limitations such as inconsistency and
potential human error.
2.2 CNN
A compact Convolutional Neural Network was used
alongside a cascaded autoencoder (CASAE) in the
task of metal defects detection (Tao et al., 2018). The
compact CNN architecture aimed to classify defects,
while the CASAE was used to localize and segment
defects. The usage of CASAE resulted in accurate
and consistent results even under complex lighting
conditions or with irregular defects. The pipeline of
the architecture started with passing the input image
to the CASAE, which outputs a segmented image of
the defects. The segments are then cropped and fed
to the compact CNN to obtain classification results.
Nevertheless, the architecture had limitations, as the
input data must be manually labelled as segments, not
Automated Detection of Defects on Metal Surfaces Using Vision Transformers
37

as bounding boxes, which takes a lot of time and ex-
pense.
2.3 RepVGG
The authors of (Li et al., 2022) provided a reference
for solving the problem of classifying aluminum pro-
file surface defects. Defective images for training
were obtained by means of digital image processing,
such as rotation, flip, brightness, and contrast trans-
formation. A novel model, RepVGG, with a convolu-
tional block attention module (RepVGG-CBAM) was
proposed. The model was used to classify ten types
of aluminum profile surface defects.
2.4 Faster R-CNN
Another novel approach proposes a method combin-
ing a classification model with an object recogni-
tion model for metal surface defects detection (Wang
et al., 2021). An improved, faster R-CNN model is
used to detect multi-scale defects better by adding
spatial pyramid pooling (SPP) (Mikołajczyk et al.,
2017) and enhanced feature pyramid networks (FPN)
modules (Girshick et al., 2017). The model aims
to increase the detection accuracy of crazing defects
by modifying the aspect ratio of the anchor. Non-
maximum suppression is used to get the bounding box
faster and better. Improved ResNet50-vd model is in-
corporated as the backbone of the classification model
and object recognition model (He et al., 2019). Detec-
tion accuracy and robustness are increased by adding
the deformable revolution network (DCN) (Zhu et al.,
2018).
2.5 YOLOv5
Among the deep learning models, the You Only Look
Once (YOLO) algorithm stands out for its capabilities
for object detection (Redmon et al., 2016). YOLO re-
frames object detection as a single regression prob-
lem, predicting bounding boxes and class probabil-
ities directly from full images in one evaluation.
YOLOv5 (Bochkovskiy et al., 2020) is a famous ver-
sion among the YOLO versions, as it was the first ver-
sion with ultralytics support. YOLOv5 was used as a
base model in metal defects detection (Wang et al.,
2022), while adding a focus structure to the base net-
work of the Darknet. Additionally, GIOU loss was
chosen over L1 loss to focus on accuracy. The back-
bone feature extraction network of the YOLOv5 was
retrained to improve the performance of the model.
However, this model faced limitations due to its in-
ability to detect small defects on metal surfaces.
3 DATASETS
Several datasets have been created to provide research
with standardized data for training and evaluating de-
fects detection algorithms. This section focuses on
three datasets - NEU-DET, GC10-DET and Multi-
DET that were used for the work done in this research.
3.1 Training Datasets
GC10-DET is a dataset for surface defects collected
in a real industry (Lv et al., 2020). The dataset con-
tains 2300 high-resolution images of surfaces with 10
different classes of defects, which are punching, weld
line, crescent gap, water spot, oil spot, silk spot, in-
clusion, rolled pit, crease, and waist folding.
NEU-DET is the Northeastern University (NEU)
surface defect dataset (Dixit, 2020). It contains 1800
grayscale images with 6 different classes of surface
defects and 300 images per defect type. The de-
fects’ classes include rolled-in scale, patches, inclu-
sion, scratches, crazing, and pitted surface. Figure 1
shows different classes from the two datasets.
Figure 1: Defect Classes from GC10-DET and NEU-DET.
3.2 Multi-DET
We introduce a new dataset called Multi-DET in or-
der to address the limitations of the current datasets.
The proposed dataset surpasses current datasets by of-
fering increased diversity and density of defects per
photo.
Multi-DET contains 300 high-resolution images
for 8 classes. Unlike traditional datasets that feature
repetitive defect types per image, our dataset covers
a wide range of defects, including scratches, welding
line, inclusion, water spot, oil spot, crescent gap , and
ICINCO 2024 - 21st International Conference on Informatics in Control, Automation and Robotics
38
variations in texture and color. Our approach mimics
real-world conditions, where metal surfaces exhibit
complex and overlapping defects. Figure 2 represents
some samples of Multi-DET dataset.
3.2.1 Dataset Collection
The dataset collection process started with surface
preparation, where metal samples were cleaned and
smoothed to ensure a uniform pattern. Following this,
different defects were introduced using various tools.
Scratches were made using sharp instruments, weld-
ing lines were simulated using a welding machine,
crescent gap were made using precise cutting tools,
and inclusions were created using contaminant ma-
terials. Oil and water spots were applied using con-
trolled droplets.
3.2.2 Dataset Pre-Processing
The pre-processing of photos in Multi-DET is a cru-
cial step in order to ensure quality and the unifor-
mity in terms of resolution, lighting, and color bal-
ance. Pre-processing involves adjusting the bright-
ness and contrast to compensate for any variations.
In addition, image denoising is used to remove any
unwanted noise that may interfere with the detection
process. Image cropping is performed to focus on rel-
evant parts of the metal, excluding information that
does not contribute to the analysis. Images are con-
verted to grayscale to enhance the feature extraction
process. Data augmentation techniques are utilized to
increase the variability of the dataset. This includes
rotating, flipping, and scaling. These transformations
represent the diversity of real-world conditions, there-
fore it was avoided to reach extreme levels of these
changes.
Figure 2: Sample photos of Multi-DET dataset.
3.2.3 Data Annotations
For annotating Multi-DET dataset, Roboflow serves
as the primary tool for creating the annotations for
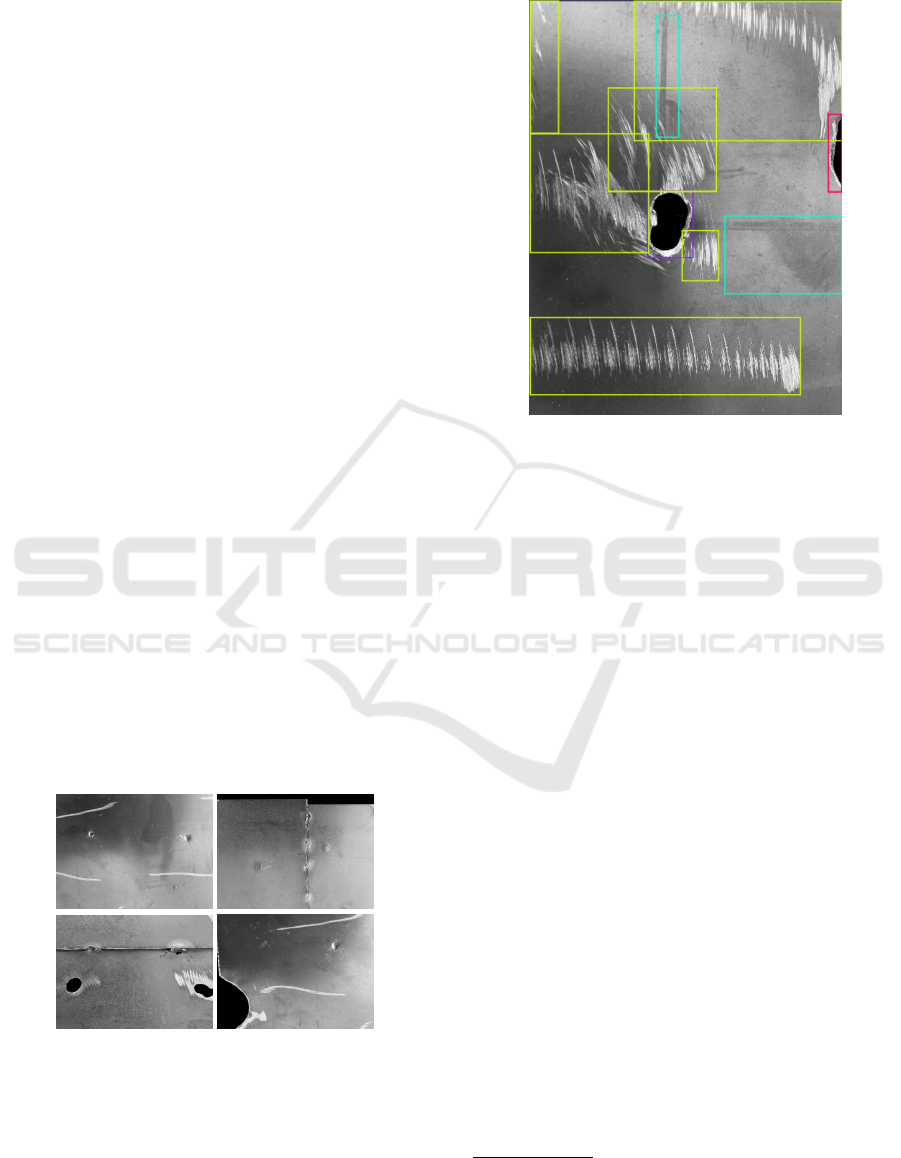
our dataset. Figure 3 illustrates the process of annota-
tions.
Figure 3: Defects bounding boxes annotation.
4 EXPERIMENTAL WORK
4.1 Methodology
This research presents an automated approach for de-
tecting defects on metal surfaces utilizing the Vision
Transformer (ViT) architecture. ViTs achieve en-
hanced accuracy via the self-attention mechanism in-
herent in transformer encoders. We utilize the ViT’s
encoder as a feature extractor, which is then for-
warded to a CNN, followed by a couple of Multi-
Layer Perceptron (MLP) models for classification and
localization. For the detection mechanism, we imple-
ment the anchor boxes method in order to dynami-
cally detect any number of defects within the input
image. This repository includes the source code for
our implementation
*
.
4.2 Vision Transformers
The architecture, Figure 4, of the ordinary trans-
former (Vaswani et al., 2017) was initially applied in
Natural Language Processing (NLP). The main pur-
pose of the transformer was to detect the relationships
between the tokens through the self-attention mecha-
nism. The architecture also added positional encoding
to the input of the multi-head attention layers, which
*
https://github.com/toqaalaa20/Metal-surface-defects-
detection
Automated Detection of Defects on Metal Surfaces Using Vision Transformers
39
allowed the transformer to keep track of the order of
the tokens.
Figure 4: Transformer architecture.
The architecture in Figure 5 of the Vision Trans-
former (ViT) used the same basic structure of the
transformer with the multi-head attention layers fol-
lowed by the MLPs and the normalization lay-
ers (Dosovitskiy et al., 2020). However, the mod-
ification was on the input of the model, as the in-
put was modified to take an image instead of a se-
quence of words. To use the same structure of the
transformer, an input image is divided into patches
and flattened. Positional embedding is added to the
patches to keep track of the position of each patch.
The encoded patches are fed to the ViT encoder. In
order to perform any task of classification or localiza-
tion, a learnable MLP is added to the output of the
encoder.
Figure 5: Vision Transformer Architecture.
4.3 Anchor Boxes
In order to dynamically detect any number of defects
in an image without being limited to a fixed number of
defects per image, the anchor boxes method was used.
The mechanism of anchor boxes was first introduced
as a part of the You Only Look Once (YOLO) model
architecture (Redmon et al., 2016). At first, a set of
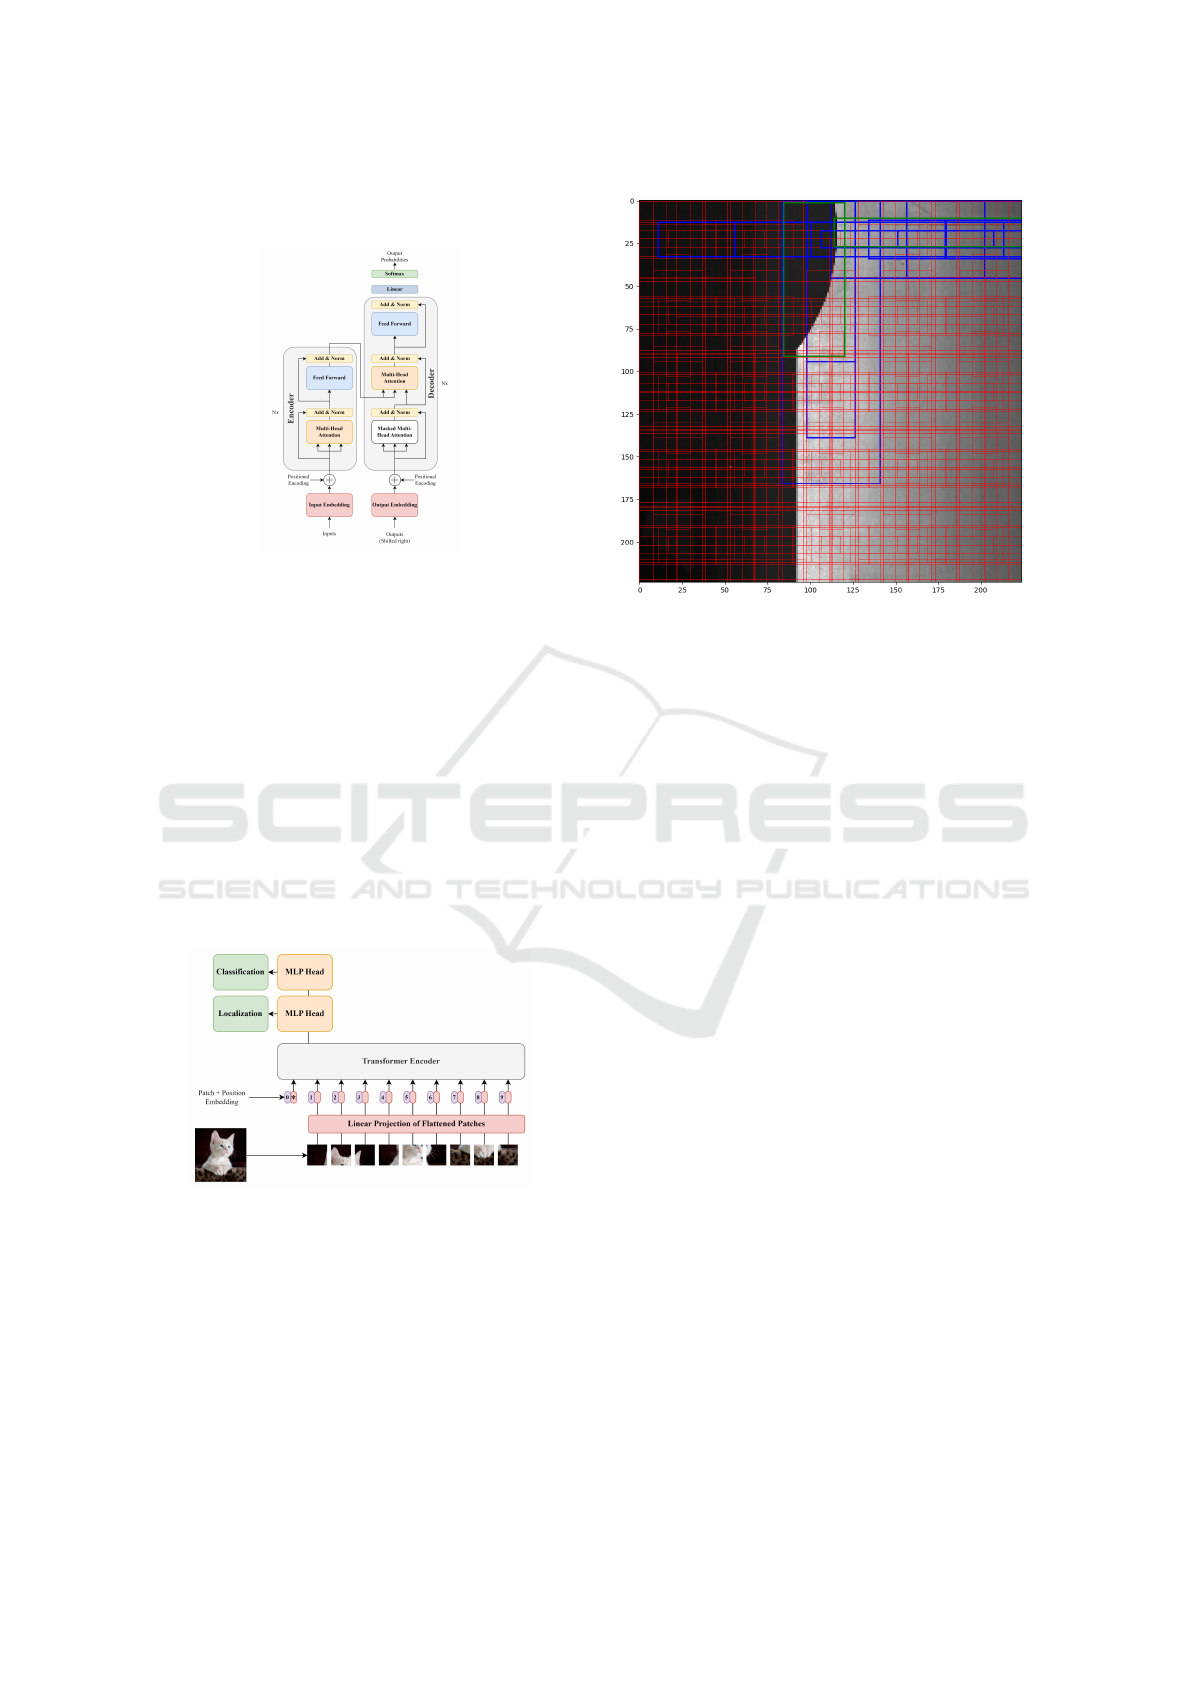
pre-defined anchor boxes (Figure 6) is defined.
Figure 6: Initialized pre-defined anchor boxes. Red boxes
are background boxes. Blue boxes are selected boxes before
offset correction. Green boxes are the ground truth.
During training, each anchor box is assigned to a
ground truth label depending on the Intersection over
Union (IOU) value. If the IoU value is higher than
an upper threshold, the anchor box gets assigned to a
ground truth label. If the IoU is lower than a lower
threshold, it is marked as background. If it is between
the two thresholds, it is marked as discarded.
After that, the offset in position from the ground
truth is calculated for the assigned anchor boxes and
set to zero for the background and discarded boxes.
The class of the ground truth is also passed to the
assigned anchor boxes. During prediction, a non-
maximal suppression is applied on the predicted an-
chor boxes in order to choose the most suitable an-
chor box from the overlaying boxes with the same
predicted class.
4.4 Data Pre-Processing
In order to fit our model architecture, all images were
resized and normalized to fit the input of the ViT en-
coder. Then, they were passed to an image processor,
which prepares the images to be a suitable input for
the ViT. The image processor ensures that the input
data is in the correct format suitable for the ViT. It
handles image transformations such as resizing, nor-
malization, and conversion to TensorFlow tensors.
After that, offsets are calculated for each image
as the distance between the anchor box point and the
ground truth point and divided by either the width or
the height of the anchor box according to the orien-
tation. This makes the offsets invariant to different
scales of anchor boxes. Afterwards, the offsets are
ICINCO 2024 - 21st International Conference on Informatics in Control, Automation and Robotics
40

normalized by passing on a min-max scaler which
subtracts the minimum value from the offset and di-
vides the result by the range. All these normaliza-
tions were made to ensure the stability of the model
and help it predict the values without overshooting or
overfitting.
4.5 Model
Our model architecture (Figure 7) consists mainly of
4 parts: ViT encoder, CNN, Classification MLP, Re-
gression MLP.
4.5.1 Feature Extraction
After the image is pre-processed using the image pro-
cessor, it is passed to the encoder of the ViT model.
The output embeddings of the encoder are then passed
on a CNN to process these embeddings and extract the
features from them.
The output of the CNN is then flattened and shared
to two different MLPs. The share mechanism is se-
lected over using two different models for classifi-
cation and localization to allow the model’s CNN to
learn the common features between classification and
localization. This will allow the model to understand
the image features better and connect the two parts of
detection together.
4.5.2 Detection
Each MLP consists of multiple dense and dropout lay-
ers followed by an output layer. The output layer is
then reshaped to (number of anchor boxes, number
of classes) in the classification MLP and reshaped to
(number of anchor boxes, 4) in the regression MLP.
This is done to apply Softmax in classification and
sigmoid in regression individually on each sample
(anchor box). Sigmoid is used as the values of the off-
sets are limited between 0 and 1 after scaling. This re-
shape will yield more meaningful results as applying
Softmax on the whole number of samples will yield
false results.
The output of the Softmax layers and sigmoid lay-
ers is then concatenated and reshaped to match the
output shape, which is [(number of anchor boxes,
number of classes), (number of anchor boxes, 4)].
4.6 Loss Functions
The model is compiled with modified versions of
Categorical Cross-Entropy and Mean Square Error
(MSE) for classification and regression, respectively.
4.6.1 Classification Head
In categorical cross-entropy, the modification aimed
to handle the fact that most anchor boxes will be as-
signed to the background class, as found in the train-
ing datasets, which will lead towards extreme bias to-
wards the background class. In other words, it would
be easier for the model to predict all classes as back-
ground than actually spotting features in the image.
To eliminate this bias, the categorical cross-entropy
is performed individually on each detection (instead
of grouping by all defects in the image) only if the
true value is not a background class. This is to mimic
a two-level categorical cross-entropy, a lower level
on each sample, and a higher level on the whole im-
age with all samples. This modification aims to stop
giving the model a positive score on detecting the
background class, which prevents bias towards this
class. Algorithm 1 describes how the modified func-
tion works.
Algorithm 1: Modified Categorical Cross-entropy.
Data: y
true
, y
pred
Result: Categorical Cross Entropy Value
N ← len(y
true
);
M ← len(y
true
[0]);
loss ← 0;
for i ← 0 to N do
for j ← 0 to M do
if argmax(y
true
[i][ j]) ̸= background
then
loss ← loss +
∑
M
m=1
y
true
[i][ j][m]log(y
pred
[i][ j][m]);
end
end
end
return loss
4.6.2 Localization Head
In MSE, the modification aimed to handle the prob-
lem that most offsets will be 0, due to the fact that
most anchor boxes are from the background class, as
found in the training datasets. The modification was
to iterate over all detections and calculate the MSE
individually for each detection only if the true values
are not zeros (background class, and then output the
total MSE. This modification results in lowering the
bias towards the background class of offset 0. Algo-
rithm 2 describes how the modified function works.
Automated Detection of Defects on Metal Surfaces Using Vision Transformers
41

Figure 7: Our Model Architecture.
Algorithm 2: Modified Mean Squared Error.
Data: y
true
, y
pred
Result: Mean Squared Error Value
N ← len(y
true
);
M ← len(y
true
[0]);
loss ← 0;
count ← 0;
for i ← 0 to N do
if
∑
M
m=1
(y
true
[i][m]) ̸= 0 then
loss ← loss +
∑
M
m=1
(y
true
[i][m] − y
pred
[i][m])
2
;
count ← count + 1;
end
end
loss ←
loss
count
;
return loss
5 EVALUATION
This section discusses the evaluation metrics used to
assess our model, the obtained results, the strengths,
and the limitations of our approach.
5.1 Metrics
Evaluation metrics are essential for assessing the per-
formance our model. In this study, we employ three
key metrics: a modified version of accuracy for de-
fect classification, a modified version of Mean Abso-
lute Error for bounding box regression, and Mean In-
tersection over Union (Mean IOU) for bounding box
localization.
5.1.1 Accuracy: Defect Classification
The modification on accuracy followed the same pro-
cedures mentioned in Algorithm 1. The accuracy
measures the proportion of the correctly classified de-
fect instances out of the total instances.
Accuracy =
Number of correctly classified defects
Total number of defects
(1)
5.1.2 Mean Absolute Error: Bounding Box
Regression
The modification on MAE followed the same pro-
cedures mentioned in Algorithm 2. MAE quanti-
fies the average absolute distance between predicted
bounding box coordinates
ˆ
B
i
= (x
ˆ
B
i
, y
ˆ
B
i
, w
ˆ
B
i
, h
ˆ
B
i
),
and ground truth bounding box coordinates B
i
=
(x
B
i
, y
B
i
, w
B
i
, h
B
i
) for each instance i.
MAE =
1
n
n
∑
i=1
|x
ˆ
B
i
− x
B
i
| + |y
ˆ
B
i
− y
B
i
|
+ |w
ˆ
B
i
− w
B
i
| + |h
ˆ
B
i
− h
B
i
|
(2)
where n is the total number of instances.
5.1.3 Mean IOU
Mean IOU measures the spatial overlap between pre-
dicted and ground truth bounding boxes across all de-
fect instances.
IOU(B
i
,
ˆ
B
i
) =
Area of overlap(B
i
,
ˆ
B
i
)
Area of union(B
i
,
ˆ
B
i
)
(3)
where:
• Area of overlap(B
i
,
ˆ
B
i
) is the area where the pre-
dicted and ground truth bounding boxes overlap.
• Area of union(B
i
,
ˆ
B
i
) is the area encompassed by
both the predicted and ground truth bounding
boxes.
Mean Intersection over Union (Mean IOU) is calcu-
lated as the average IOU across all bounding boxes:
Mean IOU =
1
n
n
∑
i=1
IOU(B
i
,
ˆ
B
i
) (4)
5.2 Results
This section emphasizes the results of the loss func-
tions, and the evaluation metrics illustrated earlier.
The figures compare the results obtained by training
our data on our model with and without using the ViT
ICINCO 2024 - 21st International Conference on Informatics in Control, Automation and Robotics
42
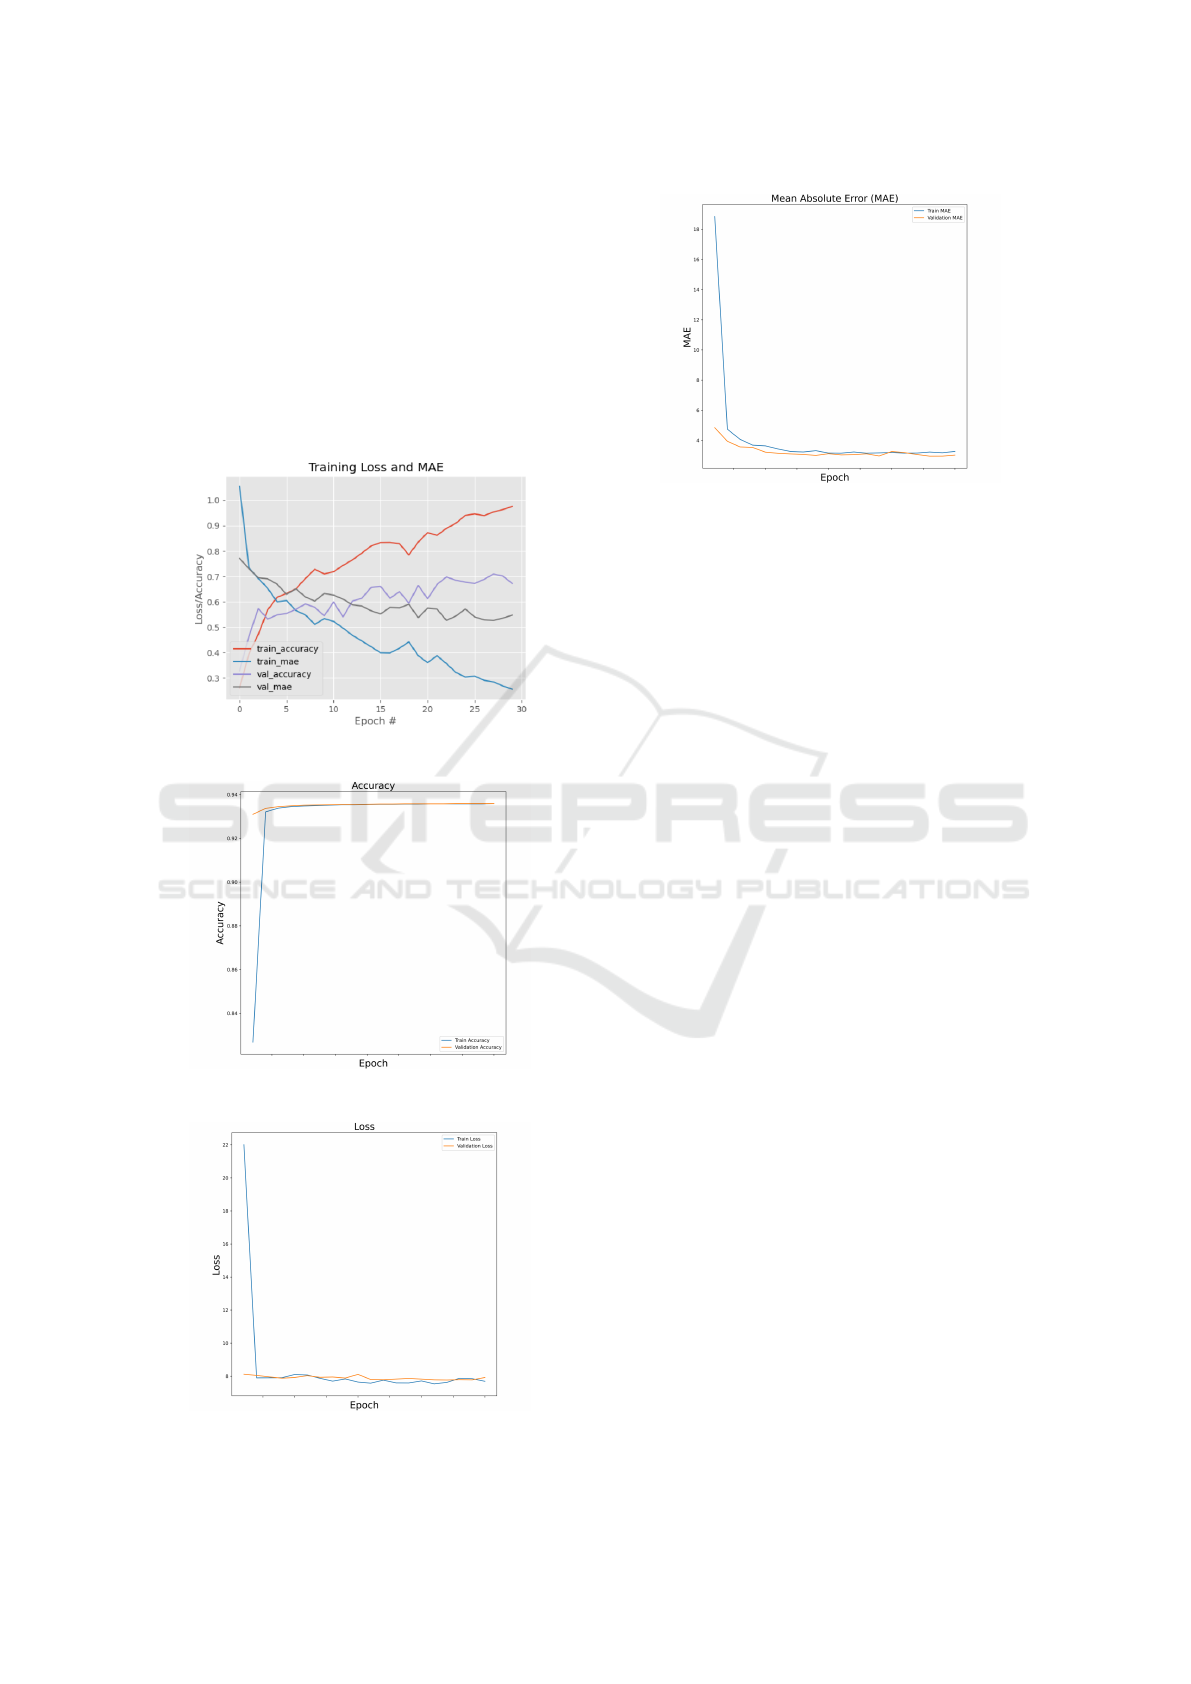
as our base feature extractor. Figure 8 shows the train-
ing versus validation accuracy and MAE without us-
ing ViT as a feature extractor. As shown in the fig-
ure, the model is overfitting our data as there is a
significant gap between the training and the valida-
tion results. Figure 9 shows the training and the val-
idation accuracy using the ViT. Figure 10 shows the
loss using the ViT. Figure 11 shows the MAE using
ViT. As the figures show, using ViT as the feature ex-
tractor has addressed the problem of over-fitting and
achieved high performance.
Figure 8: Evaluation metrics without using ViT.
Figure 9: Model accuracy using ViT.
Figure 10: Model loss using ViT.
Figure 11: MAE using ViT.
5.3 Discussion
In this study, we evaluated a metal surface detec-
tion algorithm using classification accuracy, MAE for
bounding box regression, and Mean IOU for bound-
ing box localization. Our findings indicate significant
achievements and some areas for improvement.
5.3.1 Performance Evaluation
Our model has achieved a high accuracy of 93.5% in
classifying metal surface defects. This high accuracy
emphasizes the effectiveness of our classification ap-
proach in detecting and distinguishing between differ-
ent defects.
For bounding box regression, we calculated MAE
to assess the accuracy of predicted bounding box co-
ordinates compared to ground truth. The calculated
MAE of 3.2 pixels suggests that our model can rea-
sonably predict the dimensions and positions of the
bounding boxes representing the defects.
Mean Intersection over Union (Mean IOU) was
used to evaluate the spatial overlap between pre-
dicted and ground truth bounding boxes. Our model
achieved a Mean IOU score of 0.72, indicating strong
performance in accurately localizing metal defects
within the bounding boxes.
The model has achieved State-of-the-Art results,
as shown in Table 1. Our proposed methodology
achieved a mean average precision (mAP) score of
0.732, which indicates the strong ability of our model
to classify different types of defects. It has beaten the
YOLO-backbone methods as indicated in the table.
5.3.2 Strengths and Limitations
Our study demonstrates several strengths, including
robust classification accuracy and effective bounding
box localization capabilities. These strengths high-
light the potential of our approach to contribute to au-
Automated Detection of Defects on Metal Surfaces Using Vision Transformers
43

Table 1: Comparison with State-of-the-Art Methods.
Model mAP Score
SSD 0.634
Faster-RCNN 0.627
YOLOv5 0.573
YOLOv6 0.666
Proposed Model 0.732
tomated quality control processes in metal manufac-
turing industries.
However, our approach also has limitations. For
instance, the current model may struggle with detect-
ing highly irregular defects due to limitations in the
training data. In addition, the localization and the
classification processes are not fast enough due to
the complex details of the transformer architecture.
The multi-head attention mechanism and the numer-
ous layers in the transformer architecture significantly
increase computational overhead, which further slows
down the processing speed and decreases computa-
tional efficiency.
Addressing these limitations could involve adding
more samples to Multi-DET dataset to introduce these
variations and incorporating further development on
the vision transformer to optimize the detection and
classification processes.
6 CONCLUSIONS
Automated defect detection on metal surfaces is a cru-
cial research area as it contributes to various indus-
tries, like automotive and construction. Manual in-
spection methods are slow and subjective, calling for
automated systems. This study proposes using Vi-
sion Transformers to overcome the limitations of tra-
ditional methods. ViTs, with their attention mech-
anisms, can capture complex defect patterns effec-
tively. The research focuses on defect classification
and localization, using pre-trained ViTs and transfer
learning. By automating defect detection, the ap-
proach aims to improve product quality and reduce
errors in metal manufacturing. The study addresses
a research gap in applying ViTs to metal surface de-
fect detection, contributing to the field. The promis-
ing results demonstrate accurate defect classification
and precise defect localization. The proposed model
achieved 93.5% accuracy in defect detection outper-
forming YOLO-based methods with a mean average
precision of 0.732. These results demonstrate the
model’s performance and its potential impact across
multiple industries.
Our methodology offers a promising approach for
addressing the challenges posed by metal defects in
manufacturing and reshaping industries. However,
there is still room for improvement, particularly in
addressing the model’s capability for detecting ex-
tremely overlapping and irregular shapes of defects.
This can be done by adding degrees of freedom to the
model while augmenting the training dataset. In ad-
dition, optimizing the model to work in real-time will
levitate the model’s performance. This limitation is
due to the complexity of the ViT. Despite the effec-
tiveness, ViTs are known for their high computational
demands in terms of memory and processing power.
This can be challenging when deploying the model in
real-time industrial settings.
Ultimately, this research paves the way for more
effective defect detection, ensuring the production of
high-quality metal products, and reducing operational
challenges in various industries.
ACKNOWLEDGEMENTS
We would like to extend our sincere gratitude to Eng.
Fatma Youssef, for her invaluable help and guidance
throughout this project. Her expertise and thoughtful
advice have played a crucial role in shaping the path
and achievements of this research.
REFERENCES
Bochkovskiy, A., Wang, C.-Y., and Liao, H.-Y. M. (2020).
Yolov4: Optimal speed and accuracy of object detec-
tion.
Dixit, K. (2020). Neu-det neu surface defect database.
Dosovitskiy, A., Beyer, L., Kolesnikov, A., Weissenborn,
D., Zhai, X., Unterthiner, T., Dehghani, M., Min-
derer, M., Heigold, G., Gelly, S., Uszkoreit, J., and
Houlsby, N. (2020). An image is worth 16x16 words:
Transformers for image recognition at scale. CoRR,
abs/2010.11929.
Fang, X., Luo, Q., Zhou, B., Li, C., and Tian, L. (2020).
Research progress of automated visual surface defect
detection for industrial metal planar materials. Sen-
sors, 20(18):5136.
Girshick, R., Lin, T., Dollar, P., Belongie, S., et al. (2017).
Feature pyramid networks for object detection. Face-
book AI Research (FAIR)(19 April 2017).
He, T., Zhang, Z., Zhang, H., Zhang, Z., Xie, J., and Li,
M. (2019). Bag of tricks for image classification with
convolutional neural networks. In Proceedings of the
IEEE/CVF conference on computer vision and pattern
recognition, pages 558–567.
Konovalenko, I., Maruschak, P., Brezinov
´
a, J., Pren-
tkovskis, O., and Brezina, J. (2022). Research of u-
net-based cnn architectures for metal surface defect
detection. Machines, 10(5).
ICINCO 2024 - 21st International Conference on Informatics in Control, Automation and Robotics
44

Leibfried, G. and Breuer, N. (2006). Point defects in metals
I: introduction to the theory, volume 81. Springer.
Li, Z., Li, B., Ni, H., Ren, F., Lv, S., and Kang, X.
(2022). An effective surface defect classification
method based on repvgg with cbam attention mech-
anism (repvgg-cbam) for aluminum profiles. Metals,
12(11):1809.
Lovejoy, M. (1993). Magnetic particle inspection: a prac-
tical guide. Springer Science & Business Media.
Lv, X., Duan, F., Jiang, J.-j., Fu, X., and Gan, L. (2020).
Deep metallic surface defect detection: The new
benchmark and detection network. Sensors, 20(6).
Maruschak, P., Konovalenko, I., Osadtsa, Y., Medvid, V.,
Shovkun, O., Baran, D., Kozbur, H., and Mykhai-
lyshyn, R. (2024). Surface illumination as a factor in-
fluencing the efficacy of defect recognition on a rolled
metal surface using a deep neural network. Applied
Sciences, 14(6).
Mikołajczyk, T., Nowicki, K., Kłodowski, A., and Pimenov,
D. Y. (2017). Neural network approach for automatic
image analysis of cutting edge wear. Mechanical Sys-
tems and Signal Processing, 88:100–110.
Murakami, Y. (2019). Metal fatigue: effects of small defects
and nonmetallic inclusions. Academic Press.
Redmon, J., Divvala, S., Girshick, R., and Farhadi, A.
(2016). You only look once: Unified, real-time object
detection. In Proceedings of the IEEE conference on
computer vision and pattern recognition, pages 779–
788.
Sharifzadeh, M., Alirezaee, S., Amirfattahi, R., and Sadri,
S. (2009). Detection of steel defect using the image
processing algorithms. pages 125 – 127.
Tao, X., Zhang, D., Ma, W., Liu, X., and Xu, D. (2018). Au-
tomatic metallic surface defect detection and recogni-
tion with convolutional neural networks. Applied Sci-
ences, 8(9):1575.
Vaswani, A., Shazeer, N., Parmar, N., Uszkoreit, J., Jones,
L., Gomez, A. N., Kaiser, L. u., and Polosukhin,
I. (2017). Attention is all you need. In Guyon,
I., Luxburg, U. V., Bengio, S., Wallach, H., Fer-
gus, R., Vishwanathan, S., and Garnett, R., editors,
Advances in Neural Information Processing Systems,
volume 30. Curran Associates, Inc.
Wang, K., Teng, Z., and Zou, T. (2022). Metal defect detec-
tion based on yolov5. Journal of Physics: Conference
Series, 2218(1):012050.
Wang, S., Xia, X., Ye, L., and Yang, B. (2021). Auto-
matic detection and classification of steel surface de-
fect using deep convolutional neural networks. Met-
als, 11(3):388.
Zhu, X., Hu, H., Lin, S., and Dai, J. (2018). Deformable
convnets v2: More deformable, better results. 2019
ieee. In CVF Conference on Computer Vision and Pat-
tern Recognition (CVPR), pages 9300–9308.
Automated Detection of Defects on Metal Surfaces Using Vision Transformers
45
